Pink Popsicle Rice Krispie Treats


These Pink Popsicle Rice Krispie Treats are crunchy and sweet with pink melted candy and colored sprinkles. They’re fun treats that are perfect for summer parties, Barbie-themed birthdays, and other social gatherings – guaranteed to make your friends and family smile!

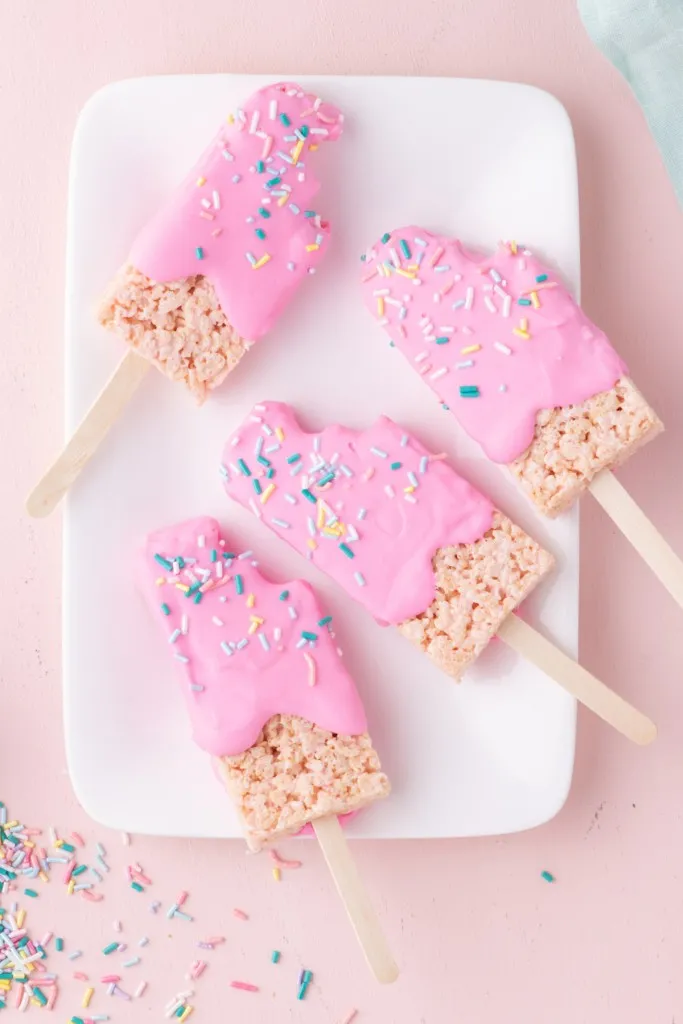
Once the Rice Krispie bars are assembled, a ‘bite mark’ is created in each corner using a cookie cutter before inserting popsicle sticks, coating the treats with pink melted candy, and decorating them with sprinkles for a fun twist on regular Rice Krispie bars!
WHAT YOU SHOULD KNOW ABOUT THESE PINK POPSICLE RICE KRISPIE TREATS
These popsicle-inspired Rice Krispie treats are regular no-bake Rice Krispie treat bars consisting of crunchy Rice Krispie cereal mixed with melted butter and gooey marshmallows.
A flower-shaped cookie cutter creates a bite mark on the corner of each Rice Krispie popsicle with melted candy melts and sprinkles to decorate these treats to resemble ice cream popsicles.
HOW SHOULD I STORE PINK POPSICLE RICE KRISPIE TREATS?
You can store these Rice Krispie popsicle treats in an airtight container at room temperature for 2-3 days with a sheet of parchment paper to line the bottom of the container, which will help prevent the treats from sticking.
Remember that the longer these Rice Krispie treats are stored, the harder and more stale they will likely become.
CAN I REFRIGERATE THESE PINK POPSICLE RICE KRISPIE TREATS?
While you could refrigerate these crunchy treats, this could affect their texture, hardening and drying them out. If you are planning to extend their shelf-life, consider freezing them instead.
CAN I FREEZE PINK POPSICLE RICE KRISPIE TREATS?
It’s possible to freeze these Rice Krispie treats for up to 3 months, which is great for leftovers or if you plan to make them in advance.
Once assembled, transfer the individual popsicle treats to a parchment-lined baking tray and flash-freeze them for about 2 hours. This will help harden the treats so that they aren’t as sticky for storage purposes.
Wrap the individual Rice Krispie treats in wax paper and then store them in an airtight container or Ziploc bag in the freezer.
You could also make the Rice Krispie bars without the melted candy melts and sprinkles and store them in the freezer. Add the melted candy melts and sprinkles just before serving.
Pink Colored Party Food
Are you looking to host a party with pink colored food? Whether it's a birthday party or a gender reveal party, these pink popsicle rice krispie treats are going to be a huge winner at your next party!
They're super perfect for when you're wanting to host a spa day, or just a fun day with your friends and kids. They'll all love how adorable these special pink desserts turn out! Faux ice cream that's actually a popsicle rice krispie treat? I'm all in!
Of course, you can easily change the colors for any occasion or to change up the color scheme for any holiday or get together!

WHAT VARIATIONS CAN I MAKE TO THIS RECIPE?
- I’ve used pink food coloring to make pink popsicle Rice Krispie treats. Feel free to change the color using blue, yellow, green, or orange food coloring. You could even make an assortment of colored popsicle treats.
- I’ve used a flower-shaped cookie cutter to create that bite-mark effect. You could skip this step if you don’t want a bite mark on your popsicles.
- Make mini pink popsicle Rice Krispie treats by cutting the Rice Krispie squares into smaller sizes.
- Consider adding some melted candy to the other side of the popsicle and a drop of melted candy at the base of the popsicle. This also helps to stabilize the treats and prevent them from falling over in case they become heavy from the melted candy applied to one side.
- I’ve used Americolor deep pink food gel, but you can use any brand of pink food gel you prefer.

TIPS FOR MAKING PINK POPSICLE RICE KRISPIE TREATS
- You can either grease the pan with butter or with a nonstick cooking spray which will help prevent the cereal mixture from sticking to the pan. Lining the pan with parchment paper is another option, although it can prove to be challenging to spread the Rice Krispie mixture evenly across it without it moving.
- You can use a buttered spatula or your hands to press the cereal mixture into the bottom of the pan. When using your hands, grease them with butter to prevent the mixture from sticking to your skin.
- Flatten the Rice Krispie mixture evenly in the pan by placing a sheet of parchment paper over it and pressing down gently with the bottom of a loaf pan.
- Don’t press the Rice Krispie mixture too hard when assembling it in the pan; otherwise, it will result in tough treats instead of soft and chewy popsicle treats.
- Don’t use a smaller pan with the aim of making thicker Rice Krispie treats. From experience, I’ve found thicker cereal treats to be difficult to eat.

Cereal-Inspired Treats!
- 4th of July Rice Krispie Treats
- Cadbury Mini Egg Rice Krispies Treats
- Lucky Charms Treats
- Autumn Trail Mix

Pink Popsicle Rice Krispie Treats
Ingredients
- 3 tablespoons unsalted butter
- 4 cups 8 ounces/228g miniature marshmallows
- Pink gel food color
- 6 cups 150g puffed rice cereal
- 12 popsicle sticks
- 2 ¼ cups 510g/18 ounces candy melts
- Colored sprinkles
Instructions
- Prepare a 9×13-inch baking pan by lining it with parchment paper, letting the sides hang over the baking pan (this will make removing the Rice Krispie treats easier).
- In a large microwave-safe bowl, add marshmallows and butter and microwave in 1-minute intervals (stirring after each interval) for a total of 3 minutes.
- Add a few drops of food color until you get the shade of pink you like (about 4 or 5)
- Add puffed rice cereal to the bowl and working quickly, stir until well coated.
- Place the mixture into the prepared baking pan and flatten evenly, covering the bottom and corners of the baking pan.
- Place in fridge to cool for 30 minutes.
- Remove from pan and cut into 2×4-inch rectangles.
- Place cookie cutter along one of the corners and press down, leaving a ‘bite’ shape. Discard (or eat the remnant)
- Using a paring knife, make a small incision into the base of the popsicle and insert a popsicle stick (leaving about 3 inches of the stick exposed). Repeat with the remaining popsicles and lay them on a parchment-lined baking sheet.
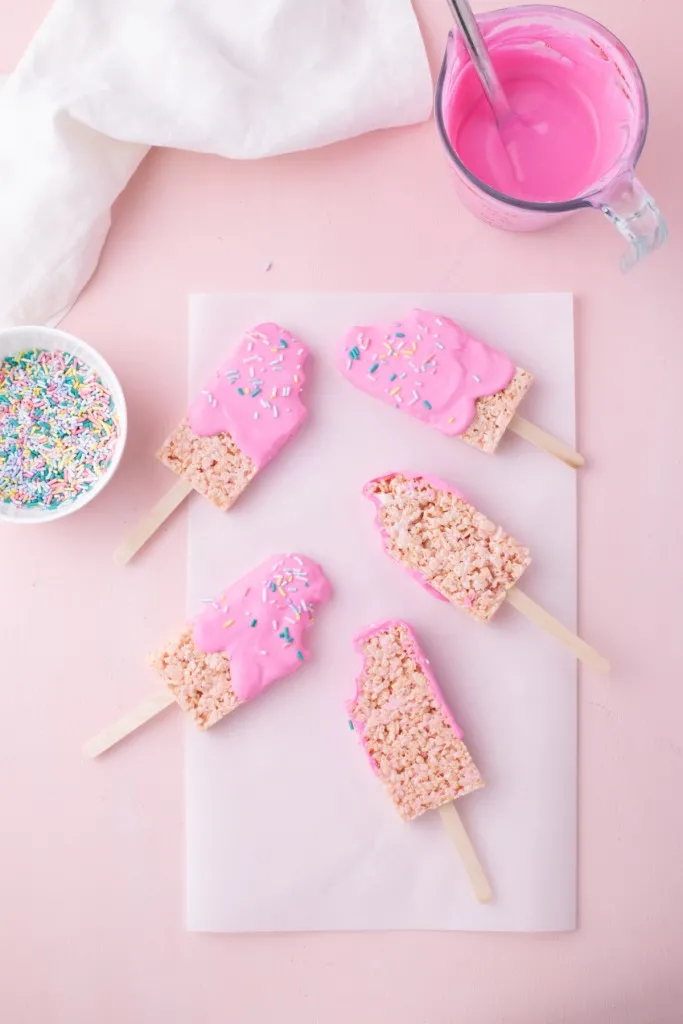
- Place candy melts in a 2-cup measuring cup and microwave in 30-second increments for about 2 minutes or until the candy is melted and smooth
- Dip a large spoon into the melted candy and drip over one side of the popsicles creating that ‘melted and dripped’ look
- Add sprinkles and allow the candy to harden before serving.
Notes
-If you find your ‘popsicles’ falling over or the melted candy too heavy for them, simply add extra melted candy to the other side of the popsicle to help stabilize it. I also like to add a drop of melted candy to the base of the popsicle where it meets the popsicle stick
-I used Americolor deep pink as the color of the food gel for the Rice Krispies.