Strawberry Crunch Cake Balls


Strawberry Crunch Cake Balls are golden Oreo crumbs and freeze-dried strawberries mixed into cream cheese, rolled into little balls, and dipped in pink candy coating and vanilla melting wafers — then finished with a crumble of Oreo and strawberry on top. Fair warning: despite the name, there's no actual cake in here. The base is golden Oreos and cream cheese, and honestly, I think that makes it better. They look like something you'd pay way too much for at a bakery. They're not complicated, though. The recipe is mostly patience: a double-chill process that takes about an hour total, and a dipping step that goes fast once you get the hang of it. If you've made my Biscoff Truffles before, you already know the move. Same idea, completely different flavor.
I made these for a summer party a few years back and brought them out on a little tiered tray next to some other desserts. They were gone in fifteen minutes. The pink coating with the crumb topping just catches people's eye, and then the flavor gets them hooked. The combination of buttery golden Oreo, concentrated strawberry from the freeze-dried fruit, and tangy cream cheese is genuinely really good. It's not subtle. It tastes exactly like a strawberry shortcake ice cream bar, which is either something you grew up loving or something you're about to discover.

About This Recipe
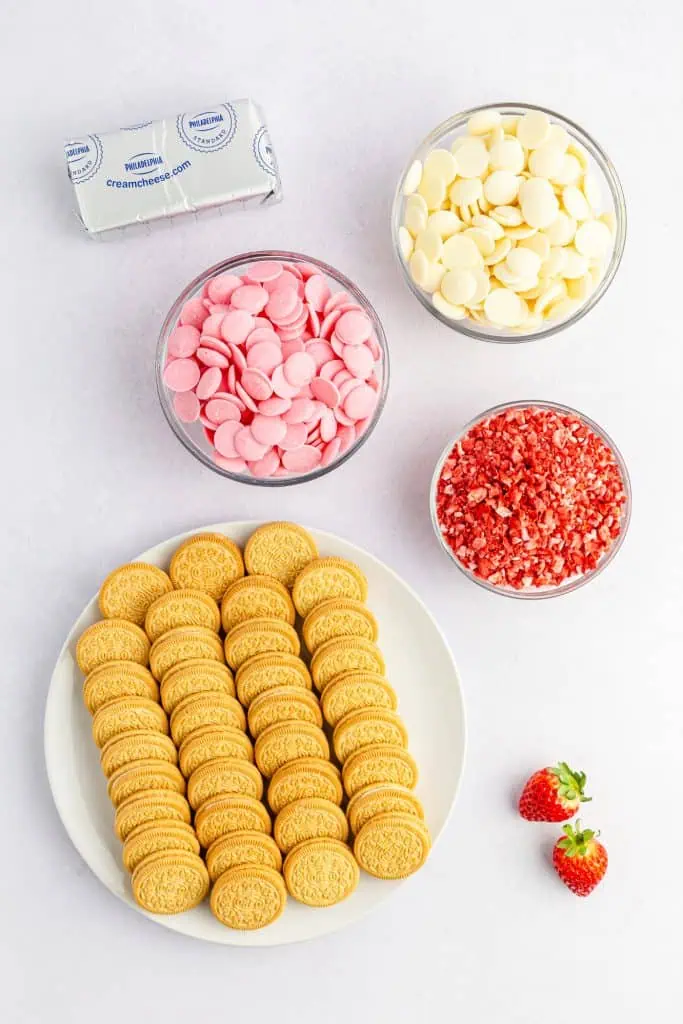
Strawberry Crunch Cake Balls are a no-bake dessert made with crushed Golden Oreos, freeze-dried strawberries, and softened cream cheese, dipped in pink candy melts and white vanilla melting wafers, then topped with reserved Oreo and strawberry crumbs. Despite the name, there's actually no cake in here! The recipe makes about 20 cake balls, takes about 30 minutes of active work, and needs two separate chill periods totaling about an hour. Room-temperature cream cheese is required. The double-chill process is what keeps the balls firm enough to dip without losing their shape.
Recipe Snapshot
- Tastes like a strawberry shortcake ice cream bar: The combination of golden Oreo, freeze-dried strawberry, and tangy cream cheese hits that exact nostalgic note. In a good way.
- No baking, no oven: Food processor, mixing bowl, fridge. That's all the equipment you need. This is a “No Cake, No Problem” type of recipe!
- Don't skip the double-chill: The dough is soft and the first chill makes it rollable. The second chill after rolling keeps the balls firm enough to dip without falling apart in the coating. Both steps matter.
- Work in batches when dipping: Keep half the balls in the fridge while you dip the other half warm cake balls are soft cake balls, and they won't hold their shape in the hot coating.
- Makes about 20 cake balls: Great for parties, gift boxes, dessert tables, or just keeping a batch in the fridge and eating them one by one over a few days.
- Best For: Summer parties, Valentine's Day, bridal showers, baby showers, bake sales, Easter, and any occasion where something cute and pink makes sense.
💡 David's Tip: Keep the melting wafers over low heat and stir constantly. If the heat creeps up too high the coating seizes, and it goes from smooth and glossy to thick, grainy, and unworkable fast. Low and slow is the move. If it does seize, stir in a teaspoon of coconut oil or vegetable shortening and it'll usually come back.
SUMMARIZE AND SAVE THIS RECIPE CONTENT ON:
Why You'll Love These Strawberry Crunch Cake Balls
The Ingredient Breakdown
Top Tip for a Crunchy Finish
Reserve your crumbs before mixing — not after. Set aside half a cup of Golden Oreo crumbs and a handful of crushed freeze-dried strawberries before combining anything. If you forget and mix everything together first, you won't have anything to top with and the finished cake balls will look plain. Put the reserved amounts in separate little bowls before you start.
How to Make Strawberry Crunch Cake Balls (Step-by-Step)
Step 1: Crush the Oreos
Line two baking sheets with parchment paper and set them aside — you'll need them ready before you start dipping. Add the Golden Oreos to a food processor and pulse until you have fine crumbs. It takes about 15 to 20 pulses. Before you remove anything from the bowl, measure out half a cup of crumbs and set it aside in a small bowl — this is your topping. The remaining crumbs go into the dough.
Step 2: Make the Dough
In a large mixing bowl, beat the softened cream cheese with a hand mixer or stand mixer until completely smooth — no lumps, no streaks. It should look glossy and move like a thick frosting. Add the Golden Oreo crumbs and 1 cup of the freeze-dried strawberries (reserve the remaining half cup for topping). Mix on low speed until evenly combined and the mixture comes together into a soft dough. It'll be pale pink from the strawberries and smell incredible — sweet, fruity, and buttery all at once.
Step 3: First Chill
Cover the bowl with plastic wrap and refrigerate for 30 minutes. Don't skip this. The dough is soft straight from mixing and will stick to your hands and lose its shape if you try to roll it right away. After 30 minutes in the fridge it firms up just enough to be scoopable and rollable without being a sticky mess.
Step 4: Roll the Balls
Use a 1½-tablespoon cookie scoop to portion the chilled dough onto the parchment-lined baking sheets. Then roll each portion between your palms to form smooth balls — they should look like small truffles. Work quickly because the warmth of your hands will soften the dough. If your hands are warm, run them under cold water and dry them before rolling. Place each ball back on the parchment. Once all the dough is rolled, slide the baking sheets back into the fridge for another 30 minutes to an hour. The balls need to be firm and cold before dipping or they'll lose their shape in the hot coating.
Step 5: Melt the White Wafers
Set aside about half a cup of the Ghirardelli vanilla melting wafers — these are for drizzling at the end. Using a double boiler over low heat, melt the remaining white wafers, stirring constantly. When they're completely smooth and glossy with no solid pieces remaining, you're ready to dip. Keep the heat on the very lowest setting while you work — candy and melting wafers both go from perfect to seized quickly if the temperature climbs.
Step 6: Dip the First Batch
Take half the chilled cake balls out of the fridge. Leave the other half in — you want them cold right up until they're dipped. Place one ball on a fork, lower it into the melted white wafers, and turn to coat completely. Lift it out and tap the fork gently on the edge of the bowl to let the excess coating drip off — you want a thin, even shell, not a thick glob. Slide it off the fork onto the parchment. Repeat with the remaining balls in this first batch.
Step 7: Melt the Pink Candy Melts and Dip the Second Batch
Remove the remaining cake balls from the fridge. Melt the pink candy melts in a clean double boiler over low heat, stirring constantly until smooth. Dip the second batch of balls the same way — one at a time on a fork, tap off the excess, place on parchment. You'll notice the pink ones look brighter and more opaque than the white-dipped ones; that contrast is part of what makes the finished plate so visually fun.
Step 8: Drizzle and Top
Place the reserved vanilla melting wafers into a heat-safe piping bag (or a zip-lock bag with a small corner snipped off). Microwave on low or defrost power in 30-second increments, massaging the bag between each session, until fully melted. Work in small groups — drizzle over three or four cake balls at a time, then immediately sprinkle with the reserved Golden Oreo crumbs and crushed freeze-dried strawberries before the drizzle sets. If you drizzle too many at once, the coating sets before the crumbs can stick. Small batches, quick hands.
Step 9: Set and Serve
Let the coating set completely at room temperature — about 15 to 20 minutes — or speed things up in the fridge for 10 minutes. The finished cake balls should feel firm to the touch with a smooth, matte shell. Serve chilled or at cool room temperature. They're best cold from the fridge.
David's Tip
If your coating is getting thick and lumpy as you work, stir in a teaspoon of coconut oil or vegetable shortening directly into the melted coating and stir until smooth again. The fat thins it back out and makes it silky and dippable. This works for both candy melts and melting wafers. It's the trick that saves a batch when things start to go sideways.

Fun Variations
Chocolate Strawberry: Use regular Oreos instead of golden and dip in dark or milk chocolate melting wafers instead of pink candy melts. The chocolate and freeze-dried strawberry combination is genuinely excellent — tart, sweet, and rich all at once.
Lemon Raspberry: Swap the freeze-dried strawberries for freeze-dried raspberries and add a teaspoon of lemon zest to the cream cheese before mixing. Dip in yellow candy melts and top with crushed raspberries and lemon zest. Bright, summery, and a little more sophisticated.
Cookies and Cream: Skip the freeze-dried fruit entirely and use regular Oreos. Dip in white chocolate and top with extra Oreo crumbs. Simple, crowd-pleasing, and exactly what it sounds like.
Blueberry Lemon: Use freeze-dried blueberries instead of strawberries, add lemon zest to the dough, and dip in purple candy melts with a white drizzle. Perfect for spring gatherings and Easter tables.
Holiday Red and Green: Use red and green candy melts for Christmas, reserve some crumbs mixed with red and green sprinkles for the topping. Same recipe, completely festive.
Serving Suggestions
Straight from the fridge: Cold, firm, and exactly right. Sometimes the best serving suggestion is just eating them.
On a tiered dessert tray: Arrange the pink and white cake balls on alternating levels of a tiered stand. Add some fresh strawberries between the rows for color and it looks like a real bakery display.
In a gift box: Line a small gift box with tissue paper and nestle the cake balls inside in rows separated by mini cupcake liners. They make a beautiful edible gift — especially for Valentine's Day or Mother's Day.
At a dessert table: These sit beautifully next to my Strawberry Cheesecake Tart for a full strawberry-themed dessert spread. Two completely different textures, the same flavor theme.
Storage and Make-Ahead Instructions
Make-Ahead: These are ideal for making ahead. You can make the dough, roll the balls, and freeze them uncoated for up to a month — then thaw, dip, and finish with the crumb topping the day before you need them. Or make and dip them fully up to two days ahead and refrigerate until serving.
Refrigerator: Store finished cake balls in an airtight container with parchment between layers for up to 5 days. They're best cold, so serve straight from the fridge. Let them sit at room temperature for 10 minutes if you want them slightly softer.
Freezer: Freeze in a single layer on parchment until solid, then transfer to a freezer-safe container or zip-lock bag with parchment between layers. Keeps up to 3 months. Thaw in the fridge overnight or at room temperature for about 30 minutes before serving.

More No-Bake Treats You'll Love
Key Lime Icebox Cake
Butterfinger Lush
Easter Oreo Truffles
Snow Cone Oreo Truffles
Chocolate Covered Peanut Butter Balls
These Strawberry Crunch Cake Balls are the kind of thing I make when I want to bring something that gets a reaction. They're a little fussy — the double chill, the dipping, the working-in-batches — but it's the manageable kind of fussy where you feel proud of what you made at the end. And they genuinely taste as good as they look. That's always the goal.
Give them a try and leave a comment below. I want to know what color coating you used and whether you did the chocolate version. Because you should try the chocolate version.

Strawberry Crunch Cake Balls
Ingredients
- 19.1 ounce family size package Golden Oreos divided
- 1 ½ cup freeze dried strawberries divided
- 8 ounce block cream cheese softened at room temperature
- 12 ounce bag Wilton pink candy melts
- 10 ounce bag Ghirardelli vanilla melting wafers divided
Instructions
- Line two baking sheets with parchment paper and set aside.
- Using a food processor or blender, pulse the golden oreo cookies until you have fine crumbs. Separate ½ cup of crumbs and set it aside for later to use as a topping.
- In a large mixing bowl, beat the softened cream cheese until smooth.
- Add the golden oreo crumbs and just 1 cup of freeze dried strawberries to the bowl and mix on a low speed until evenly combined and you get a dough consistency.
- Place into the refrigerator to chill for 30 minutes. This will help firm up the batter, making it easier to roll into balls.
- Once chilled, use a 1 ½ tablespoon cookie scoop to scoop the batter into even sizes and roll them into balls with your hands. Place each ball onto the lined baking sheet. Chill in the refrigerator for another 30 minutes to an hour. This will help the balls keep its shape when dipping into the heated melting wafers.
- Set aside ½ cup of the white melting wafers for drizzle.
- Using a double boiler, heat the remaining white melting wafers over low heat, stirring often, until fully melted.
- Remove half of the cookie balls from the refrigerator. Let the remaining balls chill in the fridge so they do not soften.
- Place one cookie ball onto a fork and dip it into the melts. Tap the fork against the edge to remove the excess and thin out the coating. Place back onto the lined baking sheet and repeat with the remaining cookie balls. Set aside.
- Clean the double boiler before melting the pink candy melts. Repeat the process with the remaining balls in the refrigerator and dip the cookie balls one by one into the melted pink melts, placing them back onto the lined baking sheet.
- Once all of the cookie balls are coated, place the extra vanilla melting wafers that were set aside into a heat safe piping bag and microwave on a low or defrost setting in 30 second increments until fully melted. Massage the bag between each time.
- Snip a small piece of the piping bag and drizzle over just a few of the cookie balls and then immediately top with Golden Oreo and freeze dried strawberry crumbs. You’ll want to work in small batches so that you are able to top the cookie balls with crumbs before the drizzle sets.
- Allow the coating to set completely before serving. You can place it back in the refrigerator to speed things up.
Notes
- Because of the cream filling from the cookies and the added cream cheese, the dough starts off soft and does not hold its shape very well. It’s important not to skip any of the chilling steps. Chilling will make it easier to roll into balls without it sticking to your hands and will also help it keep its shape when dipping. Firm cookie balls are also less likely to experience cracking.
- Remember to heat the melting wafers over low heat and stir often. Overheating can cause the melts to seize and become thicker, making it harder to get a nice thin and even coating.
Tried this recipe?
Let us know how it was!FAQs: Strawberry Crunch Cake Balls, Sorted
Can I use fresh strawberries instead of freeze-dried?
No — and this is the one substitution that really doesn't work. Fresh strawberries introduce too much moisture into the dough, which makes it too wet and sticky to roll into firm balls. Freeze-dried strawberries crush into a dry, concentrated powder that distributes evenly and actually firms up the dough. Regular dried strawberries are chewy rather than crumbly and also won't work the same way. Freeze-dried is the only option for this recipe. They're in most grocery stores in the snack or dried fruit aisle.
Why did my cake balls crack when I dipped them?
Almost always this is a temperature issue. When a cold cake ball hits hot coating, the temperature difference causes the outer layer of the ball to contract suddenly, which creates cracks. To minimize this: make sure the coating is at the lowest possible temperature you can still work with — not hot, just melted and smooth. Also, letting the dipped balls sit at room temperature to set rather than putting them back in the fridge immediately reduces cracking. If you're still getting cracks, let the rolled balls warm up slightly (5 minutes on the counter) before dipping.
My coating is getting thick and hard to work with. What do I do?
It's seizing from the heat. Stir in a teaspoon of coconut oil or vegetable shortening directly into the coating and stir vigorously — it usually brings it back to a workable consistency. If that doesn't help, remove it from the heat, let it cool slightly, and reheat very gently. Going forward, keep the heat as low as possible and stir constantly. The moment you walk away from the double boiler is usually the moment the coating goes wrong.
Do I have to use a food processor?
No — a heavy-duty zip-lock bag and a rolling pin work just as well. Put the Oreos in the bag, seal it, and roll over them until you have fine crumbs. It takes a little more elbow grease but the result is the same. A blender also works if you don't have a food processor. The goal is fine, sandy crumbs — not chunks, not powder.
How do I get a thin, even coating without a thick base underneath?
Two things help here. First, tap the fork firmly against the edge of the bowl after dipping to let excess coating drip back in. Let it drip for a few seconds before moving to the parchment. Second, slide the ball off the fork onto the paper rather than pulling up — pulling creates a thick base as the coating pools underneath. A quick flick of the wrist so the ball rolls off the fork sideways gives you a much cleaner base.
Can I make these a different color?
Yes, easily. Swap the pink candy melts for any color you like — red for Valentine's Day, lavender for spring, orange and black for Halloween. You can also tint white candy melts yourself with oil-based food coloring (not water-based — water in candy melts causes seizing). Wilton makes a full color range of candy melts that work great for any occasion.
How far ahead can I make these?
Fully finished cake balls keep in the fridge for up to 5 days or in the freezer for up to 3 months. For the best presentation, I'd add the crumb topping no more than a day ahead — the crumbs can soften slightly in the fridge over multiple days. If you're making them further in advance, freeze them untopped and add the crumb topping after thawing.