Red, White, and Blue Lush
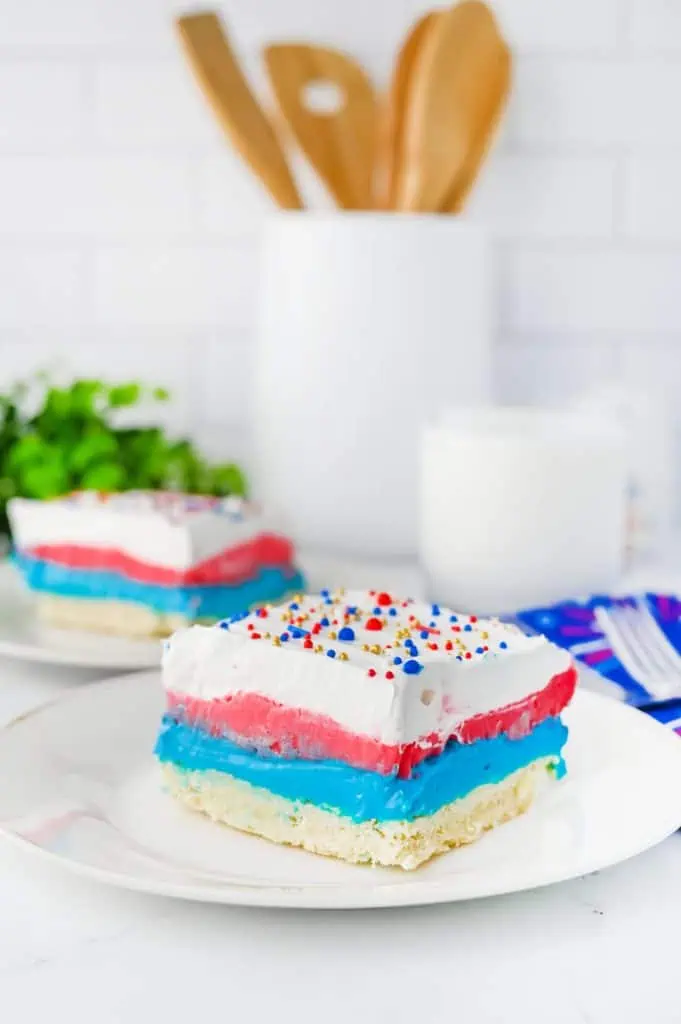
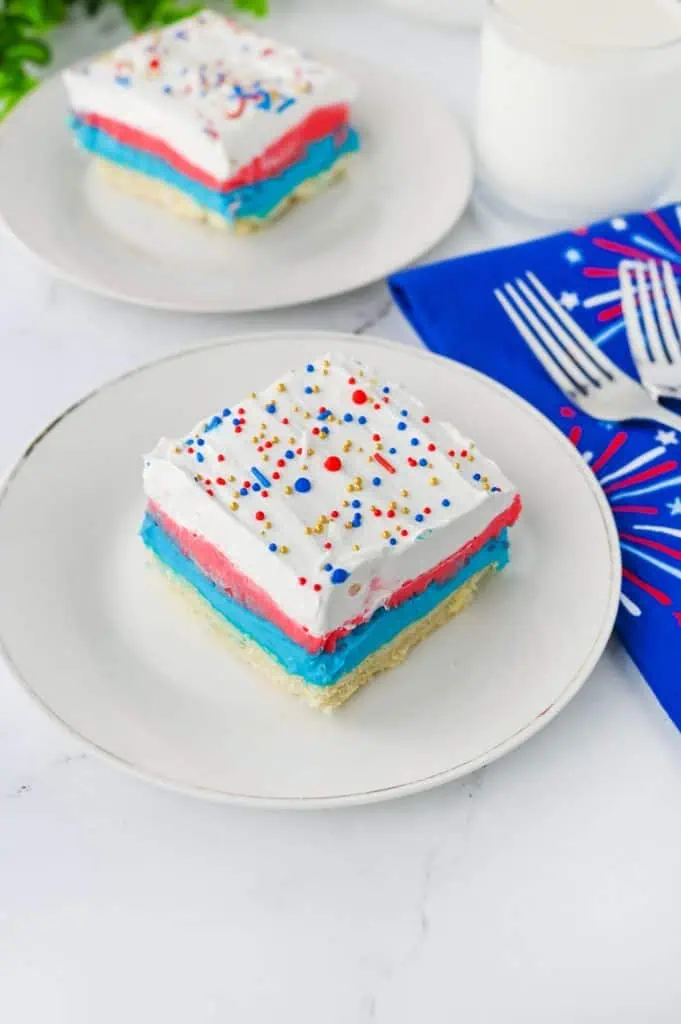
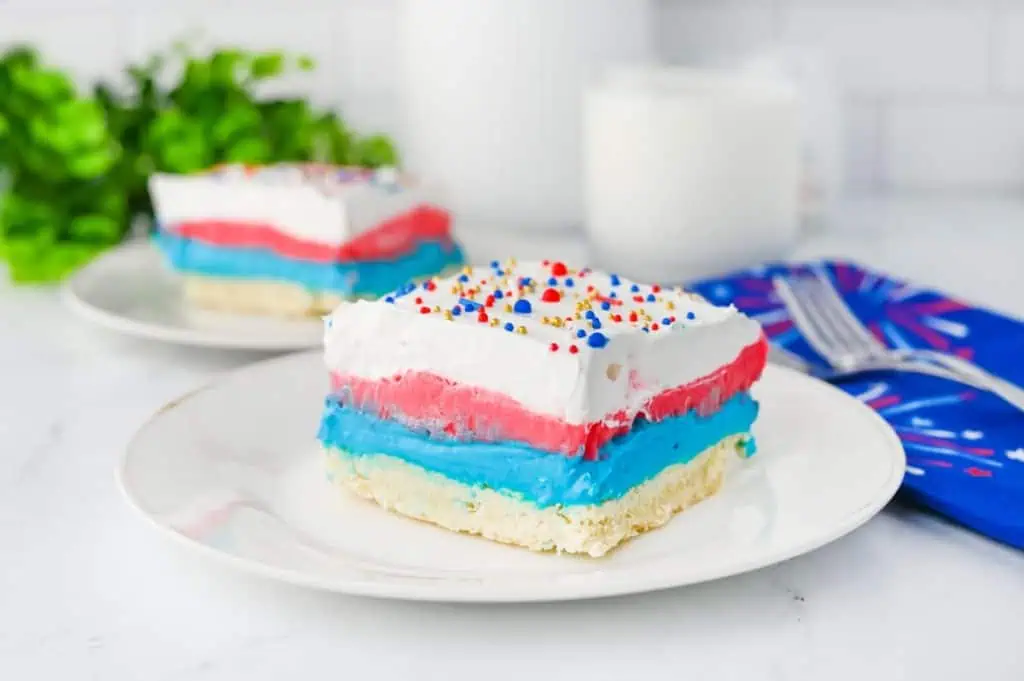
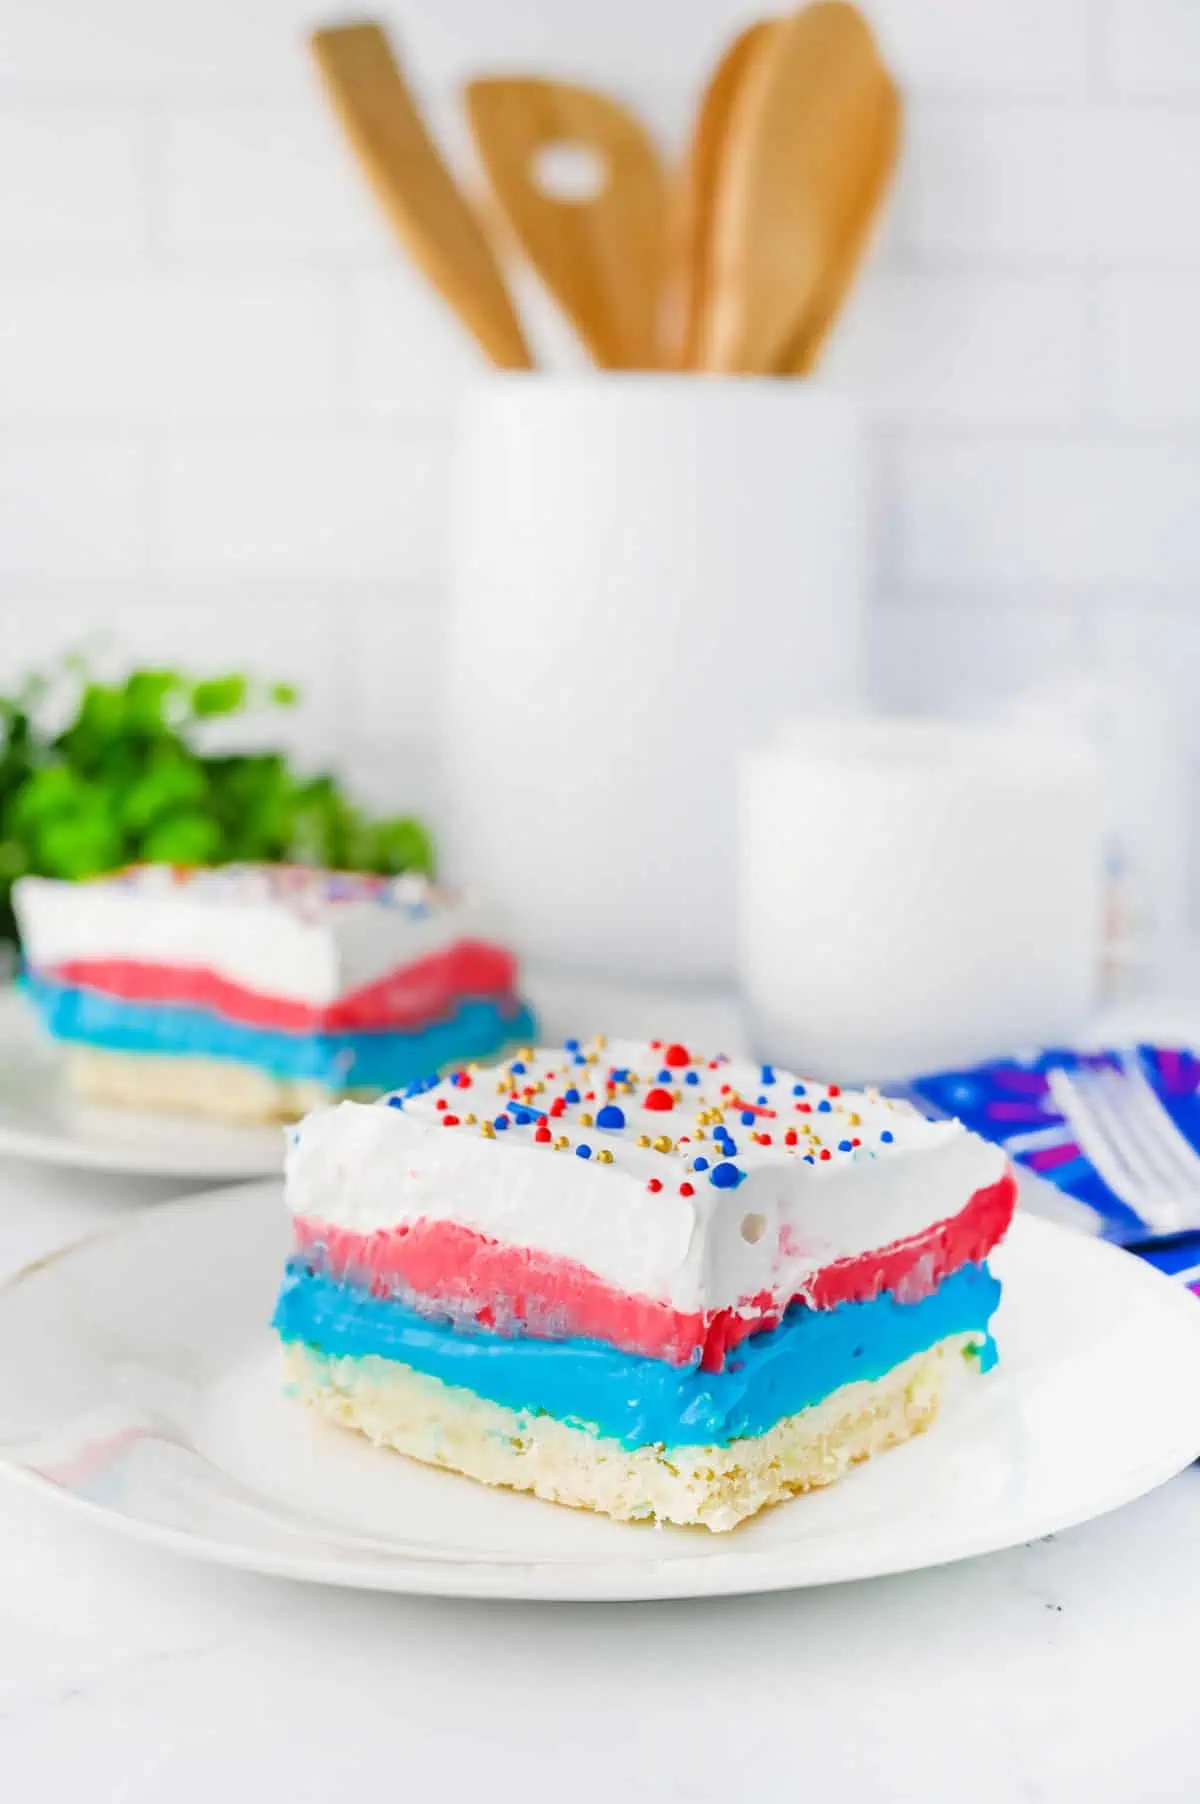
This red white and blue lush is the dessert that stops the whole cookout when it hits the table. A buttery baked shortbread crust, a bold blue cheesecake layer, a bright red pudding layer, and a fluffy cloud of whipped topping, all stacked in one 9×13 pan.
Best of all, this patriotic dessert is incredibly easy to make. Aside from baking the buttery crust, the remaining layers come together with simple mixing and chilling, making it a perfect make-ahead dessert for cookouts, family reunions, backyard barbecues, and holiday parties.
About This Recipe
This is a layered red white and blue lush built on a baked shortbread crust, topped with a blue-tinted cream cheese layer, a red cheesecake pudding layer, and Cool Whip. It serves 15 from a 9×13 pan, takes about 20 minutes of hands-on prep plus a 25 minute bake, and needs 6 hours or overnight in the fridge to set. Gel food coloring is required for both colored layers. Liquid coloring won't work here.
Recipe Snapshot
- Prep Time: 20 minutes
- Bake Time: 25 minutes
- Chill Time: 6½ hours (or overnight)
- Total Time: About 7 hours 15 minutes
- Servings: 15
- Difficulty: Easy
- Perfect For: Fourth of July, Memorial Day, Labor Day, summer parties, potlucks
- Main Ingredients: Cream cheese, cheesecake pudding, Cool Whip, buttery crust
SUMMARIZE AND SAVE THIS RECIPE CONTENT ON:
Why You'll Love This Recipe
Why This Red, White, and Blue Lush Works
The Ingredient Breakdown
Top Tip for a “Fabulous” Finish
Add gel coloring a little at a time and mix fully before judging the shade. Gel keeps deepening as it disperses, and the colors darken slightly more as the dessert chills. Aim for one shade lighter than your target and let the fridge finish the job. You can always add more. You can never take it out.
How to Make Red White and Blue Lush
Step 1: Bake the Shortbread Crust
Preheat your oven to 350 degrees Fahrenheit and spray a 9×13 baking dish with non-stick spray. In a large mixing bowl, use a fork to cut the butter and flour together until the mixture looks light and crumbly, like coarse sand with some pea-sized bits of butter still visible. Press it evenly into the bottom of the dish and bake for 25 minutes. It's done when the edges turn light golden and your kitchen smells like butter cookies.
Step 2: Cool the Crust, Then Go Blue
Let the crust cool completely. Touch the bottom of the pan, not just the crust. If the pan is still warm, wait. The first time I made a lush, I got impatient here and the cream cheese layer slumped soft and greasy at the edges within the hour. Once it's truly cool, beat the cream cheese and powdered sugar in a large bowl until smooth and fluffy, then mix in a very generous amount of blue gel coloring until the color is deep and even with no white streaks. Spread it over the crust using the spoonful trick from David's Tip, smooth the top, and refrigerate for 30 minutes to set.
Step 3: Whisk the Red Layer
In a large bowl, whisk together both pudding mixes, the cold milk, and a generous amount of red gel coloring for about 2 minutes. You'll feel it thicken under the whisk, and it's ready when it holds a soft trail across the surface for a second before sinking back in. Spoon it gently over the chilled blue layer and smooth it out to the edges.
Step 4: Crown It and Chill
Spread the Cool Whip carefully over the red layer, working from small dollops the same way you did before, until you've got one smooth, snow-white top from edge to edge. Cover the pan and move it to the refrigerator for at least 6 hours, or overnight if you can stand the wait. It's fully set when the pan doesn't jiggle in the center and a knife tip comes out of the pudding layer clean.
Step 5: Sprinkle, Slice, and Serve
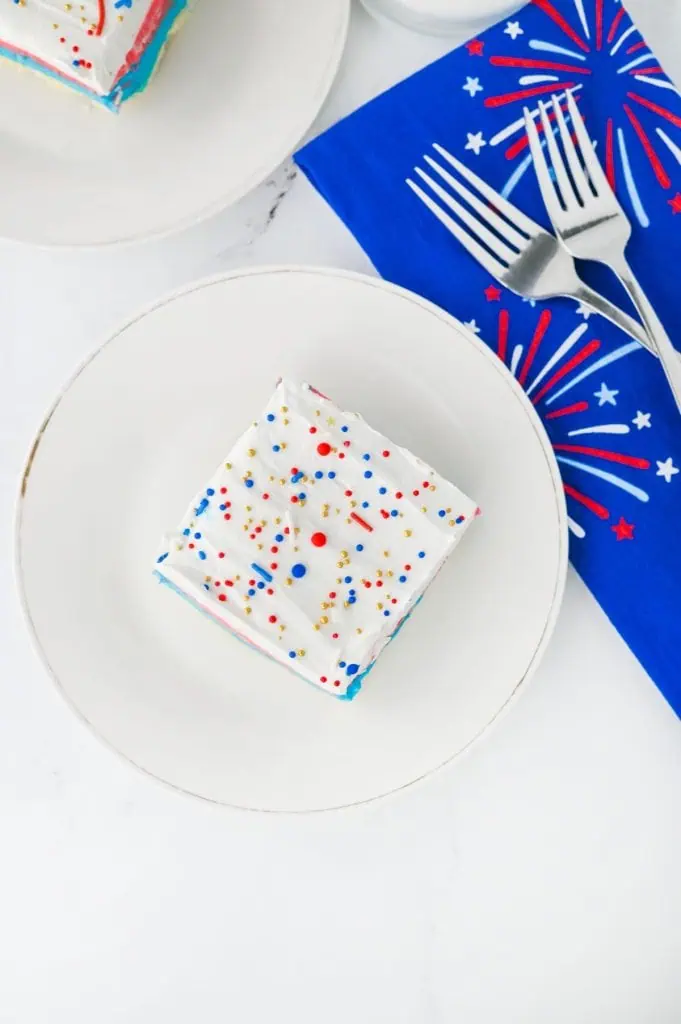
Right before serving, shower the top with 4th of July sprinkles. For picture-perfect squares, run a sharp knife under hot water, wipe it dry, and cut, wiping the blade clean between every single cut. Each slice should show three crisp stripes of blue, red, and white sitting on that golden crust. That first cross-section view is the whole reason you made this.
David's Tip
Never drag one big blob of filling across a layer. Drop small spoonfuls all over the surface first, then gently connect them with an offset spatula. You're barely moving anything, so the layer underneath stays put and your stripes stay sharp. This is the difference between clean lines and purple mud.
Fun Variations (Make It Your Own)
Berry flag top: Skip the sprinkles and arrange fresh blueberries and halved strawberries on the Cool Whip in a flag pattern. Gorgeous, and the fruit cuts the sweetness.
Any-holiday lush: Swap the gel colors and this works year round. Red and green for Christmas, orange and purple for Halloween, pastels for Easter. Same dessert, new outfit.
Golden Oreo shortcut crust: Crush about 36 Golden Oreos with 6 tablespoons of melted butter and press into the pan, no baking needed. You trade the sturdy shortbread bite for a softer, sweeter base, but you also never turn on the oven.
Vanilla pudding swap: If cheesecake pudding mix is sold out (it happens every July), vanilla or white chocolate pudding steps right in. The red layer tastes a touch sweeter and less tangy.
Add a crunch layer: Scatter a handful of chopped pecans or crushed pretzels over the blue layer before the pudding goes on for a salty little surprise in the middle.
Storage & Make-Ahead
Room temperature: Two hours maximum, and only 1 hour if it's out in the summer heat. Cream cheese, pudding, and whipped topping all need to stay cold, so park the pan in a larger dish of ice if it's living on a buffet table.
Refrigerator: Covered tightly with plastic wrap, it keeps for 3 to 4 days. The crust softens a little each day, but the layers hold their stripes, and plenty of people in my house argue it's better on day two.
Freezer: This one actually freezes, because Cool Whip handles the freezer better than real whipped cream. Wrap the pan in plastic wrap and foil and freeze up to 1 month, then thaw overnight in the fridge. The texture comes back slightly less silky, so I save freezing for leftovers rather than the party centerpiece.
Make-ahead: Build the whole thing the night before and hold the sprinkles until serving. The overnight chill is genuinely better than the minimum, so the make-ahead version isn't the backup plan. It's the best version.
More Recipes You'll Love
- If layered and creamy is your dessert language, my Butterfinger lush is the candy-loaded cousin of this recipe and every bit as dangerous to leave unattended in your fridge.
- For the rest of your patriotic dessert table, the 4th of July Rice Krispie treats are the fast, no-bake crowd-pleaser that kids grab first every time.
- My Patriotic Oreo cookies take 15 minutes and add one more pop of red, white, and blue without turning on the oven.
- And if you want a second make-ahead stunner chilling next to this one, the key lime icebox cake brings a bright, tart contrast that's perfect after a big BBQ plate.
Light the Sparklers
This is the dessert that earns its spot on the table every single summer. It's cold, it's creamy, it's ridiculously festive, and the fridge does the hard part while you're off grilling. One pan feeds the whole party, and that first sliced square with its three clean stripes never stops feeling like a little victory.
Make it for your next cookout and come tell me how it went. Did you go the berry flag route? Try the Golden Oreo crust? Let a kid pick the sprinkles? Drop a comment below and leave a star rating on the recipe card. I read every one, and hearing how these recipes land at your table is my favorite part of this whole thing.
Red, White, and Blue Lush
Ingredients
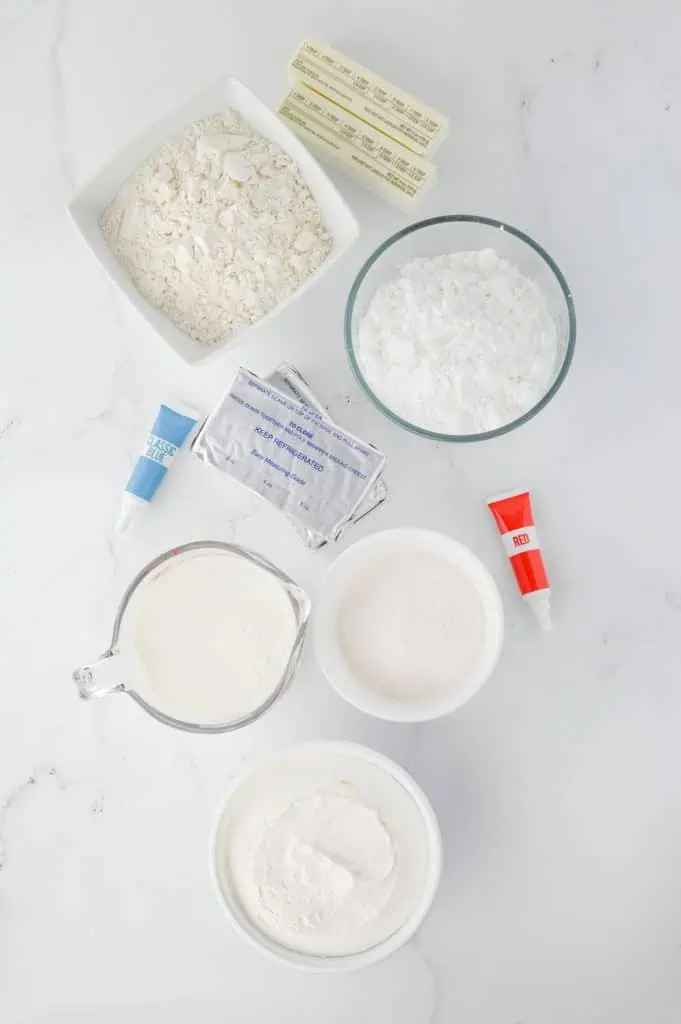
- 2 cups all purpose flour
- 1 cup unsalted butter
- 16 ounces cream cheese
- 2 cups powdered sugar
- Blue gel food color
- 2 3.4 oz 3.4 oz. packages of cheesecake pudding mix
- 3 cups milk
- Red gel food color
- 8 ounces cool whip
- 1 tbsp 4th of July sprinkles optional
Instructions
- Preheat your oven to 350 degrees Fahrenheit. Spray a 9×13 baking dish with non-stick spray.
- In a large mixing bowl, use a fork to cut the butter and flour together, until combined, light and crumbly.
- Press this mixture into the bottom of the baking dish.
- Bake 25 minutes. Allow the crust to cool.
- While crust is cooling, In a large mixing bowl, beat cream cheese and powdered sugar. Add a very generous amount of blue gel food coloring, and mix until well combined.
- Layer this mixture into the pan over the crust and smooth out evenly. Move this to the refrigerator for 30 minutes to set.
- In a large mixing bowl, whisk together pudding, milk, and a generous amount of red gel color. Layer this over top of the cream cheese layer.
- Finally, add the cool whip, and carefully smooth out evenly.
- Move the dessert to the refrigerator to chill for 6 hours, or overnight.
- If desired, top with sprinkles before serving.
Nutrition
Notes
Pro Tips
- Soften the cream cheese for real: An hour on the counter minimum. If you press a finger into it and it doesn't leave a dent easily, it's not ready, and no amount of beating will fully rescue lumps.
- The hot knife trick is not optional: Hot blade, wipe, cut, repeat. It's how bakery cases get those glass-clean layer lines, and it takes 2 extra minutes for a dessert that looks twice as impressive.
- Chill between every layer when in doubt: The recipe builds in a 30 minute set for the blue layer. If your kitchen is hot, give the red layer a quick 15 in the fridge before the Cool Whip goes on too.
- Use a glass 9×13 if you have one: The layers are the show, and a clear dish lets people see the stripes from the side before you even cut it.
- Make it tonight for tomorrow: Overnight chilling sets the layers firmer than the 6 hour minimum, and slicing goes from good to flawless. Party day you will thank party eve you.
- Freeze it 30 minutes before slicing: If your squares are coming out soft, a half hour in the freezer firms everything up just enough for clean cuts without actually freezing it.
Tried this recipe?
Let us know how it was!FAQs: Red, White, and Answered
Why is my pudding layer runny?
Almost always one of three things: the milk wasn't cold, the milk was skim or non-dairy, or the mix was cook and serve instead of instant. Instant pudding thickens by reacting with cold dairy milk, so use whole or 2% straight from the fridge and whisk a full 2 minutes. If it's already runny, let it sit in the fridge for 10 minutes before spreading and it usually catches up.
Why did my layers bleed together?
Either the crust was still warm, a layer skipped its chill time, or the spreading was too aggressive. Heat is the enemy of clean stripes, so cool the crust completely, chill the blue layer the full 30 minutes, and always spread from small dollops instead of dragging one big scoop across the pan.
Can I make red, white, and blue lush ahead of time?
Yes, and you should. It needs at least 6 hours to set, and overnight is even better because the layers firm up and slice cleaner. Build it the night before your party, keep it covered in the fridge, and add the sprinkles right before serving so their colors don't bleed into the Cool Whip.
Can you freeze this lush dessert?
You can, up to 1 month, because Cool Whip holds up in the freezer better than homemade whipped cream. Wrap the pan tightly in plastic wrap and foil, then thaw overnight in the refrigerator before serving. Expect the texture to come back a touch less silky than fresh, which is why I freeze leftovers rather than the party batch.
Can I use liquid food coloring instead of gel?
I don't recommend it. Liquid coloring is weak, so you need a huge amount to get past pastel, and all that extra liquid thins the cream cheese layer and keeps the pudding from setting as firm. Gel coloring delivers bold color from a small squeeze without touching the texture. It's a couple dollars at any craft store or grocery baking aisle and worth every penny.
How long does red, white, and blue lush last in the fridge?
Covered tightly, 3 to 4 days. The shortbread crust softens gradually as it sits under the creamy layers, so it's at its textural best in the first 2 days, but the flavor holds strong to the end. Keep it in the coldest part of your fridge, not the door.
Can I swap the shortbread crust for a cookie crust?
Absolutely. Crush about 36 Golden Oreos or 2 cups of graham cracker crumbs with 6 tablespoons of melted butter, press into the pan, and chill for 20 minutes instead of baking. You'll lose the sturdy, cookie-like bite of the baked shortbread and gain a softer, sweeter base, plus you never have to turn the oven on in July.