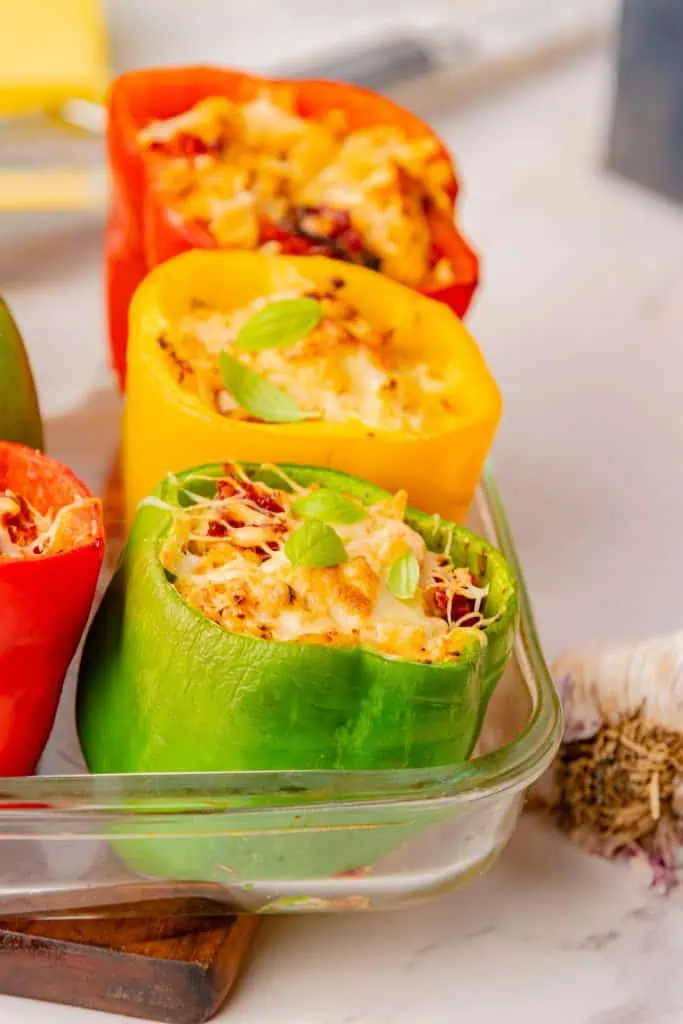
Marry Me Chicken Stuffed Peppers
Marry me chicken stuffed peppers take the sauce that made the original classic marry me chicken viral and turn it into a complete meal packed inside a roasted bell pepper. The creamy sun-dried tomato filling, combined with shredded chicken and cooked rice, bakes into something that holds its shape, gratinates on top, and looks genuinely stunning on the table. It's the kind of dish that makes people ask you when you found time to cook something that impressive on a weekday.
I went through a few rounds of testing before I got the filling right. The first batch was dry and grainy — I hadn't used enough cream in the filling, and the rice absorbed everything during baking. The second batch was too loose and ran out the sides. The fix was straightforward once I understood what was happening: the filling needs to look slightly wet before it goes in, because the rice keeps absorbing liquid throughout the entire bake. If it looks thick and stiff in the bowl, it'll be dry in the pepper. Trust the process and go wetter than you think you need to.
I use my homemade sun-dried tomatoes in oil in the filling, finely chopped so they distribute evenly through every bite. If you have a batch already in the fridge — which you should at this point in the cluster — you're halfway there. Day-old rice from the fridge works better here than freshly cooked rice, for a reason I'll explain in the ingredient section.
About This Recipe
These are baked marry me chicken stuffed peppers filled with a creamy sun-dried tomato, shredded chicken, and rice mixture, topped with freshly grated Parmesan. The recipe makes 2 to 3 stuffed peppers, takes about 15 minutes of active prep, and bakes at 400F for 25 to 30 minutes. The filling must look slightly wet before going into the raw peppers — it firms up as it bakes. Day-old rice is strongly preferred over freshly cooked. Can be assembled up to 24 hours ahead and baked directly from the fridge.
Recipe Snapshot
- Fresh Twist on a Favorite: All the creamy Marry Me Chicken flavor served inside tender peppers.
- Great for Meal Prep: Stuffed peppers store and reheat beautifully for easy meals.
- Simple Ingredients: Cooked chicken, cheese, and vegetables turn into a satisfying dinner.
- Easy to Customize: Add rice, vegetables, or extra toppings.
- Best For: Weeknight dinners, meal prep, family meals, and leftover chicken.
David’s Tip: If your peppers have uneven bases and tip sideways in the baking dish, either slice a thin sliver (about 5mm) off the bottom to create a flat surface, or nestle them in a muffin tin. The cups hold them perfectly upright without any slicing.
SUMMARIZE AND SAVE THIS RECIPE CONTENT ON:
Why You'll Love This Recipe
The Ingredient Breakdown
Top Tip for a “Fabulous” Finish
Cover the peppers with foil for the first 15 minutes of baking if they're large or if your oven runs hot. This prevents the Parmesan from burning before the pepper walls are fully tender. Remove the foil for the last 10 to 15 minutes to gratinate.

How to Make Marry Me Stuffed Peppers (Step-by-Step)
Step 1: Prep the Peppers and the Oven
Preheat your oven to 400F (200C). While it heats, prepare the peppers. Slice off the very tops, about half an inch, and remove the seeds and inner membranes with your fingers or a small spoon. Stand them upright in a baking dish. If they tip, slice a thin sliver off the bottom to create a flat base. They should stand without support in the dish. The raw peppers go directly into the oven with the filling — no pre-cooking required at this temperature and time.
Step 2: Make the Filling
In a large bowl, combine the shredded chicken, cooked day-old rice, finely chopped sun-dried tomatoes, and heavy cream. Season generously with salt, black pepper, and red pepper flakes. The filling should feel slightly loose — it should scoop easily off a spoon, not clump like a dry salad. If it's stiff, add another tablespoon of cream. Stir in half of the grated Parmesan until evenly distributed. Taste the filling before it goes in the peppers — you want it properly seasoned because the pepper itself adds no salt to the dish.
Step 3: Fill and Top
Spoon the filling into each pepper, pressing firmly with the back of the spoon to eliminate air pockets. Pack it in! You want the filling dense enough to hold its shape when you cut through the pepper after baking. Any air pockets create dry spots and uneven heating inside. Fill each pepper to the top, slightly mounded. Scatter the remaining Parmesan over each topped pepper generously. It should look like a good coating, not a sprinkle.
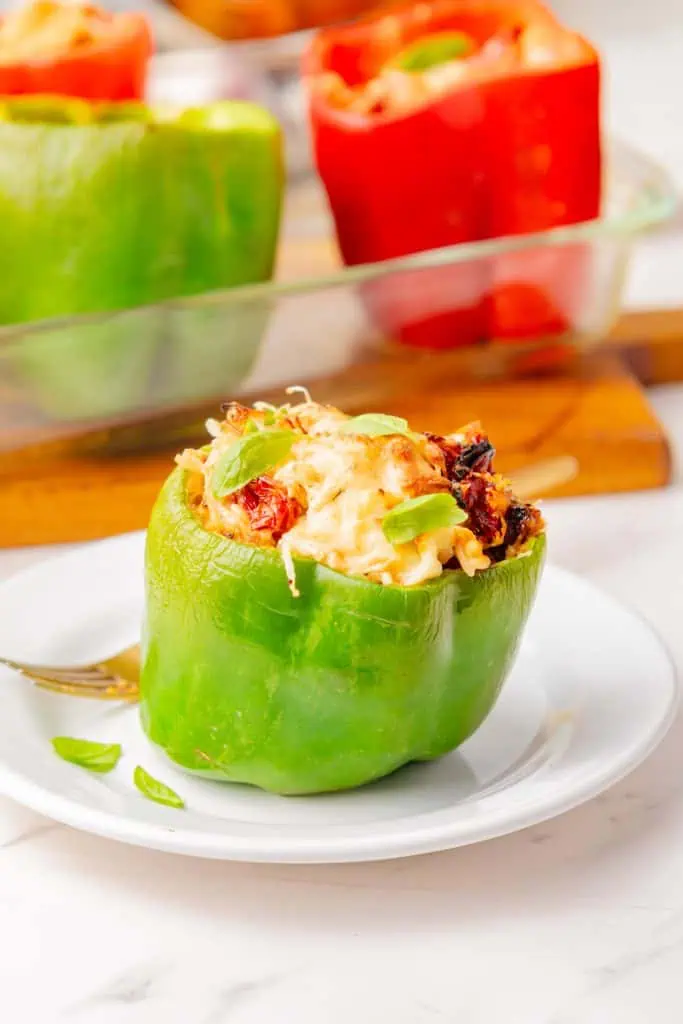
Step 4: Bake to Golden
Place the filled peppers in the oven. For the first 15 minutes, tent loosely with foil if your peppers are large. Remove the foil and bake for another 10 to 15 minutes until the Parmesan topping is deeply golden — not pale yellow, actually golden-brown in spots — and a thin knife or skewer slides through the pepper wall with almost no resistance. The walls should have some collapse to them; they'll go slightly wrinkled on the outside as they soften. Let rest 5 minutes before serving. The filling will set slightly and be easier to eat without falling apart.
David's Tip
Parmesan is the right cheese for the gratinated crust specifically because its low moisture and high fat-to-protein ratio means it melts into a crispy, golden topping. Mozzarella goes rubbery and wet at the same temperature.
Storage and Make-Ahead Instructions
Refrigerator (baked): 3 to 4 days in an airtight container. Reheat covered in a 350F oven for 15 minutes — don't microwave, the filling goes rubbery.
Make-ahead (unbaked): Assemble the filled peppers, cover tightly with plastic wrap, and refrigerate up to 24 hours. Bake directly from the fridge, adding 5 to 7 extra minutes to the total baking time.
Freezer (unbaked): Individually wrap assembled peppers and freeze for up to 2 months. Bake from frozen at 375F, covered, for 35 to 40 minutes, then uncover for the final 10 minutes to gratinate the top.
Freezer (baked): Freeze for up to 1 month. Thaw overnight in the fridge and reheat covered in the oven. The Parmesan topping won't re-crisp as well as freshly baked, but the filling reheats beautifully.
More Chicken Recipes You'll Love
- Marry Me Chicken Pasta
- Chicken Roll Ups with Marinara
- Chicken Tater Tot Casserole
- Buffalo Chicken Lettuce Wraps
- Creamy Tuscan Chicken
- Slow Cooker Crack Chicken
If you make these, I'd love to see your pepper hero shots — the vertical straight-down angle with the Parmesan crust golden and the pepper walls visible is the one worth capturing. Tag me or drop a comment below with what color peppers you used and whether the muffin tin trick saved you.

Marry Me Chicken Stuffed Peppers
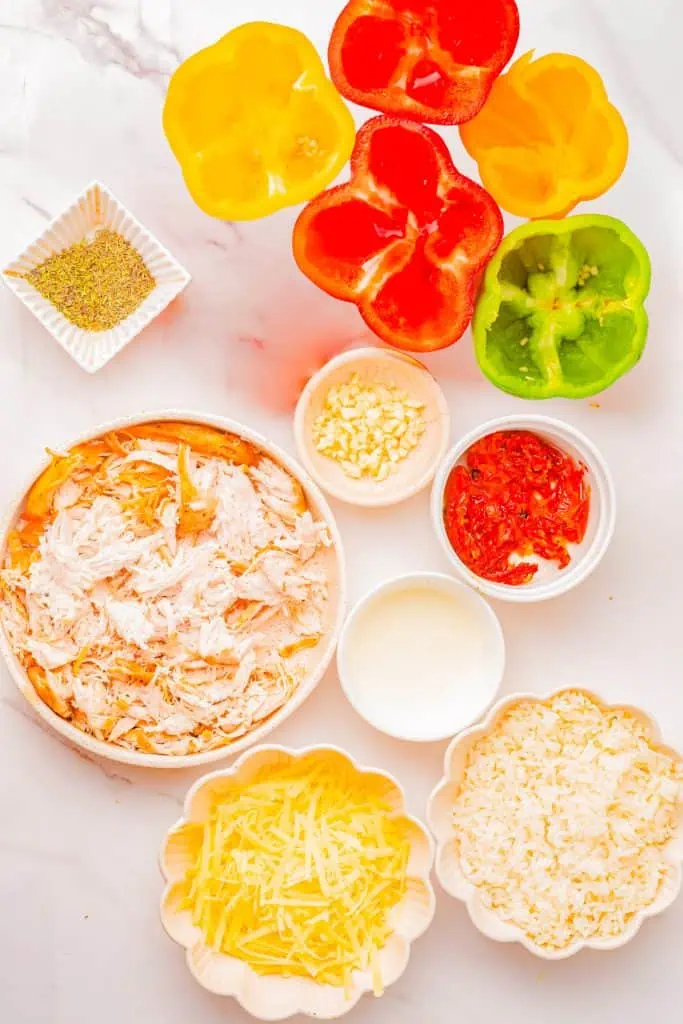
Ingredients
- 3 medium bell peppers red, yellow, or orange — avoid green for sweetness
- 1 large chicken breast cooked and shredded
- 1 cup cooked white rice day-old rice works best — less sticky
- ¼ cup sun-dried tomatoes finely chopped
- ½ cup heavy cream
- ½ cup Parmesan freshly grated
- Salt pepper, red pepper flakes, fresh basil
Instructions
- Prep the peppers. Preheat oven to 400°F (200°C). Slice off the tops of the peppers and remove seeds and membranes. Stand them upright in a baking dish.
- Make the filling. In a bowl, combine shredded chicken, cooked rice, sun-dried tomatoes, and cream. Season well. The filling should look slightly wet — it will tighten as it bakes. Stir in half the Parmesan.
- Fill and top. Spoon the filling into the raw peppers, packing firmly. Top each with the remaining Parmesan.
- Bake. Bake 25–30 minutes until the pepper
Nutrition
Notes
Pro Tips
- Pack the filling firmly: Press it down with a spoon so there are no air pockets. Air pockets create dry spots and uneven heating through the filling.
- Day-old rice is worth planning for: If you know you're making this tomorrow, cook a cup of rice tonight, spread on a baking sheet, and refrigerate uncovered. Even 6 hours of drying makes a difference.
- Don't skip the 5-minute rest: The filling is loose right out of the oven. Resting allows it to set enough that when you cut through the pepper, the filling holds its shape rather than collapsing.
- Muffin tin trick: If you're scaling up and have more peppers than your baking dish can hold standing upright, a standard muffin tin holds them perfectly and keeps them vertical throughout baking.
- Reheat in the oven, not the microwave: Microwaving these makes the filling rubbery and the pepper walls limp. Covered in a 350F oven for 15 minutes brings them back close to their original quality.
Tried this recipe?
Let us know how it was!FAQs: Stuffed Pepper Questions You Were Going to Ask
Can I skip the rice and just use chicken?
You can, but the filling will be looser and less substantial — it won't hold its shape as well when you cut through the pepper. If skipping rice, reduce the cream by a third and add a tablespoon of cream cheese to give the filling more body and structure.
How do I know when the peppers are done?
Pierce the wall of a pepper with a thin knife or skewer. It should slide through with almost no resistance. The Parmesan topping should be deeply golden — not pale yellow, not just beginning to brown. If the top is done but the walls still feel firm, tent with foil and add 5 more minutes.
Can I freeze these?
Yes — freeze unbaked, fully assembled peppers individually wrapped in plastic, then foil. Bake from frozen at 375F for 35 to 40 minutes covered, then uncover for 10 minutes to finish the topping. They reheat extremely well from frozen.
Can I use raw chicken instead of pre-cooked?
Not for this format. Raw chicken inside a dense filling inside a closed pepper won't cook evenly in the time the pepper needs to bake. You'd end up with overcooked peppers and undercooked chicken, or raw-in-the-middle filling. Always pre-cook the chicken first.
My filling is running out of the pepper sides — what happened?
The cream proportion was too high or the filling wasn't packed firmly enough. It should scoop, not pour. Pack the filling in with the back of a spoon and press down to eliminate air gaps. Also check that you've removed all the inner membranes, which can block the filling from seating properly at the base of the pepper.
Can I make these vegetarian?
Yes. Replace the chicken with a can of drained chickpeas (roughly crushed with a fork) or cooked lentils. The texture is different but the cream and rice filling still holds together well, and the flavor is surprisingly satisfying. Season slightly more aggressively since you're losing the savory depth of the chicken.
What's the best way to reheat these?
Covered in a 350F oven for 15 minutes. This is the only method that keeps the pepper walls from going limp and the filling from turning rubbery. Avoid the microwave if at all possible — it doesn't treat cream-based fillings kindly.