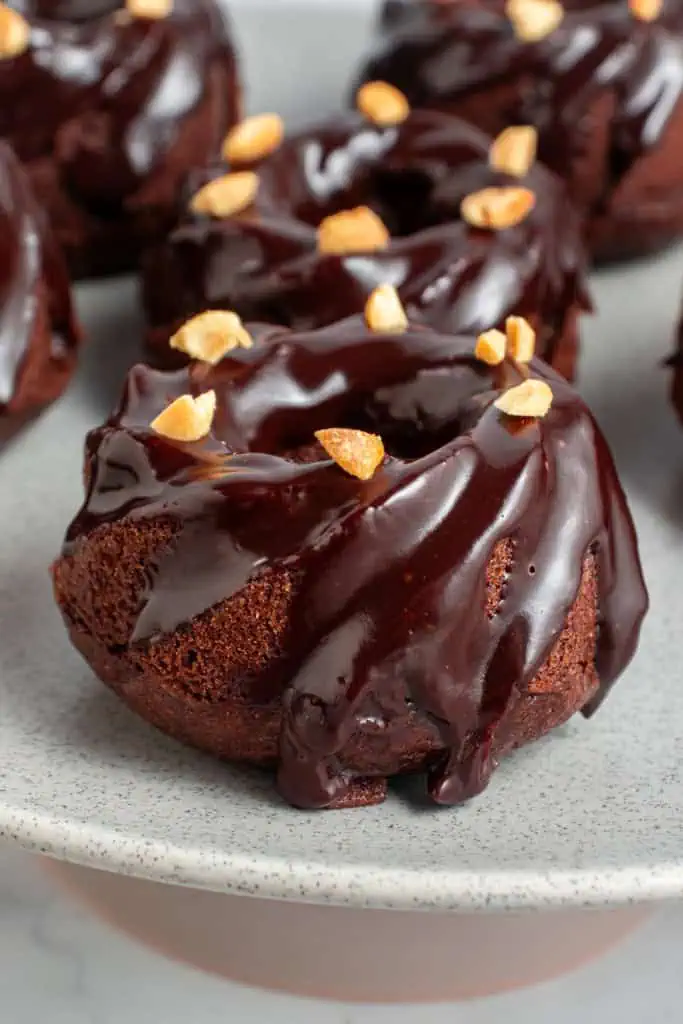
Mini Chocolate Bundt Cakes with Silky Ganache


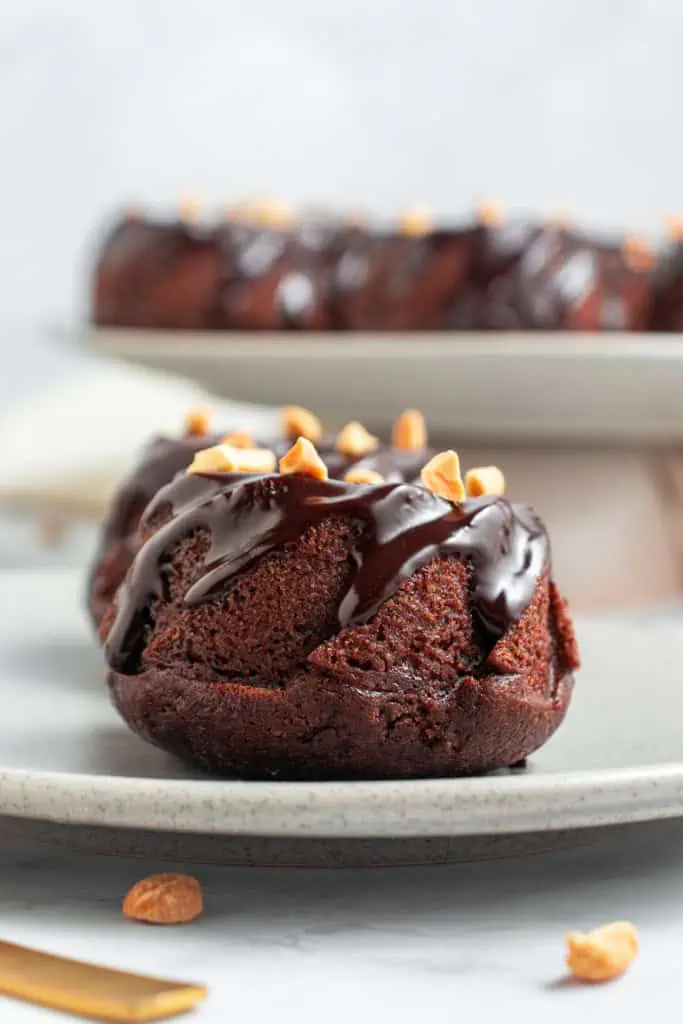
These mini chocolate bundt cakes are one of those desserts that instantly look impressive the second they come out of the pan. Between the deep chocolate flavor, the glossy glaze dripping down the sides, and those beautiful little bundt swirls, they feel bakery-worthy without being difficult to make. I love desserts like this because everybody gets their own little cake, and there’s something extra fun about individual desserts sitting on a dessert table instead of slicing one big cake for a crowd.
The best part is the texture. These cakes stay soft, rich, and incredibly moist thanks to buttermilk, oil, and hot coffee in the batter. Nobody wants dry chocolate cake, ever. If you already love cozy chocolate desserts like my Boston Cream Poke Cake or Chocolate Ganache Tart, these mini bundt cakes absolutely belong on your baking list too.
Recipe Snapshot
- Ultra Moist Texture: The vegetable oil keeps these mini cakes soft for days instead of drying out overnight.
- Rich Chocolate Flavor: Cocoa powder and hot coffee create a deep chocolate flavor without making the cakes overly sweet.
- Beautiful Presentation: Mini bundt cakes automatically look fancy with almost no decorating effort.
- Perfect for Parties: Individual cakes are easy to serve for birthdays, holidays, showers, and dessert tables.
- Best For: Christmas dessert trays, Valentine’s Day, birthdays, bake sales, dinner parties, and cozy weekend baking.
💡 David’s Tip: Take your time greasing the mini bundt pan. Those little curves and ridges love holding onto cake batter if you rush it.
Why You'll Love This Recipe
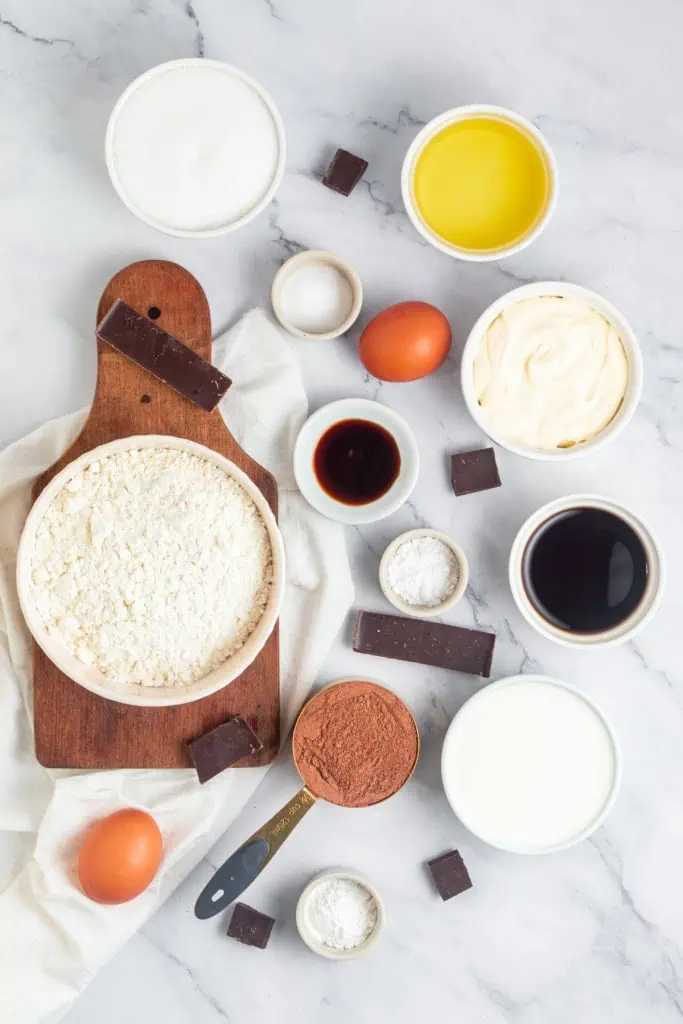
The Ingredient Breakdown
Top Tip for a Perfect Release
If you want these cakes to pop out of the pan looking flawless, don't just use cooking spray! Grease your mini bundt pan thoroughly with butter or oil, then dust it with a little cocoa powder. Tap the pan upside down over the sink to remove the excess. This trick prevents the cakes from sticking to those intricate mold edges and ensures you get that professional, sharp detail every time.
How to Make Mini Chocolate Bundt Cakes (Step-by-Step)
Step 1: Prep Your Pan and Preheat
Preheat your oven to 350°F. Grease each cavity of the mini bundt pan thoroughly with nonstick spray or softened butter, making sure you get into every curve and ridge of the mold. Then dust with cocoa powder and tap out the excess. This two-step prep is the difference between cakes that release cleanly and cakes that stick and tear — don't skip it.
Step 2: Mix the Dry Ingredients
In a large bowl, whisk together the sugar, cocoa powder, flour, baking powder, baking soda, and salt until the mixture is uniform in color with no cocoa clumps. This step makes sure the leaveners are evenly distributed throughout, which is what gives you a consistent rise across all 18 cakes.
Step 3: Mix the Wet Ingredients
In a separate bowl, whisk together the vegetable oil, vanilla extract, eggs, and whole milk until smooth. Stir in the room-temperature instant coffee last. The mixture will look very dark and rich at this point — that's a good sign. Make sure everything is at room temperature before you combine; cold eggs or cold milk can cause the batter to look slightly curdled, which affects the final texture.
Step 4: Combine and Mix
Pour the wet ingredients into the dry ingredients and whisk gently until just combined and no flour streaks remain. Stop as soon as the batter comes together. Overmixing is the number one reason chocolate cakes turn out dense and rubbery instead of light and tender — the more you mix, the more gluten develops in the flour. A few small lumps in the batter are totally fine.
David's Tip
Switch from using a whisk to a rubber spatula for the last few folds. It gives you much more control and makes it almost impossible to accidentally overmix.
Step 5: Fill the Pan and Bake
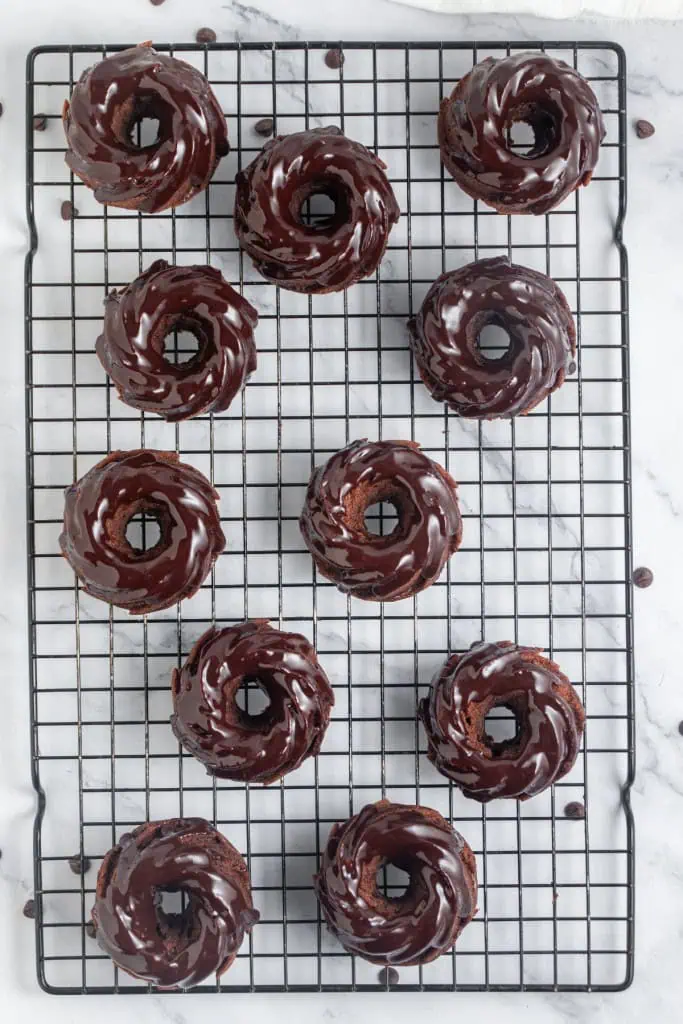
Fill each bundt cavity about 3/4 of the way full. Bake at 350°F for 20 to 25 minutes. The cakes are done when a toothpick inserted into the thickest part comes out clean or with just a few moist crumbs — no wet batter. The tops will spring back gently when lightly pressed. Let the cakes cool in the pan on a wire rack for a full 15 minutes before you try to remove them.
Step 6: Make the Ganache
In a small saucepan over medium heat, warm the heavy cream until it just begins to simmer — you'll see small bubbles forming around the edges. Remove it from the heat, add your chopped chocolate, and put the lid on. Let it sit undisturbed for five minutes. Then remove the lid and stir slowly from the center outward until the ganache is completely smooth and glossy. Let it cool at room temperature for about 15 minutes before pouring — you want it fluid enough to pour but thick enough to coat.
Step 7: Glaze and Finish
Set the completely cooled cakes on a wire rack with parchment paper underneath to catch the drips. Pour or spoon the ganache over each cake and let it run naturally into the ridges. If you're adding toppings — flaky salt, sprinkles, crushed nuts, or anything else — scatter them on immediately while the ganache is still wet. Give the ganache at least 10 minutes to set before plating and serving.
Fun Variations
Holiday Confetti: Fold 1/3 cup of rainbow jimmies into the batter before filling the pans — fun for birthdays and bake sales.
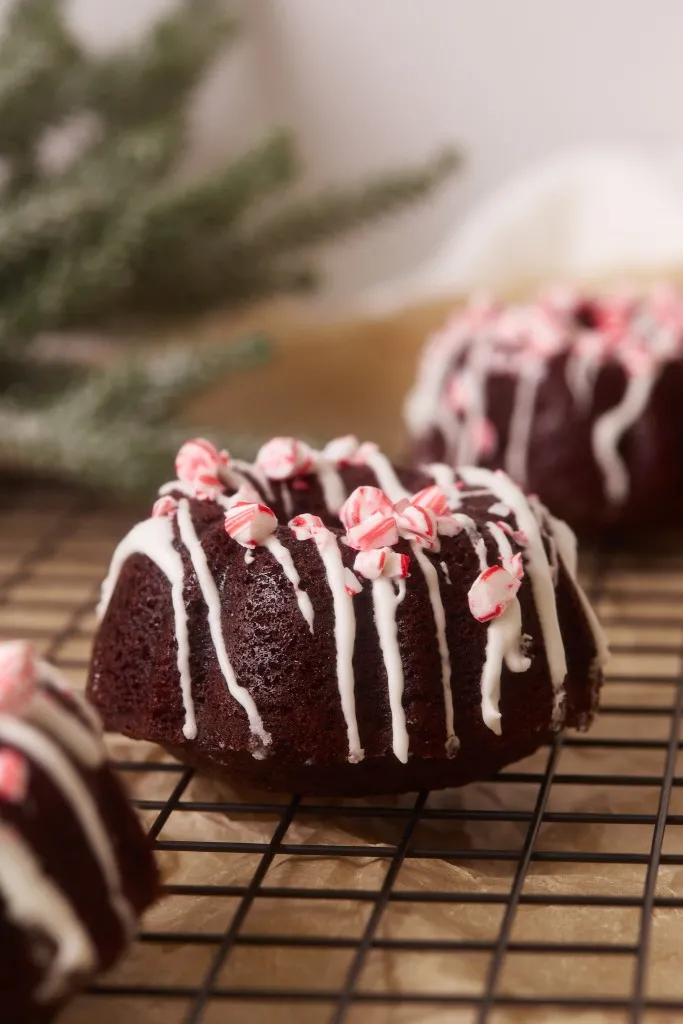
Peppermint Chocolate: Add 1/2 teaspoon of peppermint extract to the batter and top the finished ganache with crushed candy canes. A holiday favorite and one of the prettiest versions of this cake — check out my Chocolate Peppermint Mini Bundt Cakes for more inspiration.
Mocha Ganache: Stir a teaspoon of espresso powder directly into the warm ganache before pouring. The mocha flavor is subtle but really elevates the whole dessert.
Orange Chocolate: Add the zest of one large orange to the batter and replace two tablespoons of milk with fresh orange juice. A bright, classic flavor pairing that works especially well in winter.
Gluten-Free: Swap in a 1:1 gluten-free all-purpose flour blend and you'd never know the difference. Slightly denser texture but still wonderfully moist.
Storage & Make-Ahead Instructions
Room Temperature: Store unfrosted cakes in an airtight container at room temperature for up to 2 to 3 days. Hold off on the ganache until you're closer to serving.
Refrigerator: Ganache-topped cakes can be stored in an airtight container in the fridge for up to one week. Let them sit out for 15 to 20 minutes before serving so the ganache softens back to a glossy finish.
Freezer: Wrap individual unfrosted cakes tightly in plastic wrap, then a layer of foil, and freeze for up to 3 months. Thaw overnight in the fridge and top with fresh ganache before serving.
Make-Ahead Tip: Both the cakes and the ganache can be made 2 to 3 days ahead and stored separately in the fridge. When you're ready to serve, bring both to room temperature, loosen the ganache with a splash of cream if needed, and glaze. Takes less than 5 minutes.
Ready to Make These?
These mini chocolate bundt cakes are the kind of recipe I keep coming back to because they punch way above their effort level. Rich chocolate flavor, silky ganache, beautiful individual presentation — and the whole thing comes together in about 50 minutes. That's my favorite kind of recipe.
Give them a try and let me know how they turned out in the comments! I love hearing which toppings you went with, whether you tried one of the variations, or if you served them for a special occasion. And if you share a photo on Pinterest, tag FoodnService — I'd love to see your beautiful bundt cakes.
More FoodnService Desserts You’ll Love


Mini Chocolate Bundt Cakes with Silky Ganache
Ingredients
- 1 ½ cups granulated sugar
- ¾ cup cocoa powder
- 2 cups all-purpose flour spoon and level
- 2 tsp baking powder
- ½ tsp baking soda
- 1 tsp salt
- ¾ cup vegetable oil
- 2 tsp vanilla extract
- 2 large eggs at room temperature
- 1 cup whole milk
- 1/2 cup instant coffee room temperature
- ¾ cup heavy cream
- 6 oz chocolate bar of choice I like to use 70% cacao
Instructions
- Preheat oven to 350°F. Grease the mini bundt pan.
- In a large bowl, whisk together sugar, cocoa powder, flour, baking soda, baking powder, and salt.
- In a separate bowl, whisk oil, vanilla, eggs, milk, and instant coffee.
- Pour the wet ingredients into the dry, whisking until no lumps remain. Pour in room-temperature coffee and mix until just combined.
- Pour batter into prepared pan and bake at 350°F for 20-25 minutes, or until a toothpick inserted in the cake comes out clean (with a few crumbs on it). Let the cakes cool on a drying rack in the pan for 15 minutes before removing them from the pan. Cool the cakes completely before adding the ganache.
- In a saucepan on medium heat, bring heavy cream to a simmer, stirring occasionally. Next, remove from heat and add chopped chocolate to the pan. Place lid on chocolate chips and let sit without mixing for 5 minutes. Lastly, mix until combined. Let the ganache sit uncovered for 15 minutes or until it is room temperature before pouring it over your cakes.
Nutrition
Notes
David's Tips for Success
Coffee hack: Use instant espresso powder for deeper flavor.Room temp ingredients: Ensures even mixing and rise.
Ganache control:
- Thicker glaze: Cool ganache longer.
- Drizzle consistency: Use warm.
- Pan prep: Dust greased pans with cocoa powder to prevent sticking.
Tried this recipe?
Let us know how it was!FAQs: Chocolate Bundt Questions, Answered
What pan do I need to make mini chocolate bundt cakes?
You need a mini bundt pan — most commonly a 12-cavity pan where each well is roughly the same size as a standard muffin cup. This recipe makes 18 cakes, so you'll bake in two batches with one pan. A 6-cavity pan works too, just in three rounds. No mini bundt pan at all? Use a standard 10-inch bundt pan and bake for 40 to 50 minutes, or a muffin tin at 18 to 20 minutes.
Can I make this without a mixer?
Yes, and you should. This recipe is designed to be mixed by hand with a whisk and spatula. Using a stand mixer or hand mixer makes it too easy to overmix the batter, which develops gluten in the flour and leads to dense, rubbery cakes. Two bowls and a whisk are all you need here.
Why did my mini bundt cakes stick to the pan?
Almost always a pan prep issue. Every ridge and curve of the bundt mold needs to be properly greased — nonstick spray alone often isn't enough for pans with intricate designs. Grease thoroughly, then dust with cocoa powder (not flour), tap out the excess, and wait the full 15 minutes after baking before trying to remove them. Rushing that step is the other main culprit.
Can I skip the coffee in the batter?
You can, but I'd encourage you not to. The instant coffee doesn't make the cakes taste like coffee at all — it amplifies the chocolate flavor and makes everything taste richer and deeper. If you absolutely can't use it, substitute 1/2 cup of warm water plus an extra teaspoon of vanilla extract to keep the moisture balance right.
My ganache turned out grainy or seized up — what happened?
This usually means the cream was too hot and scorched the chocolate, or the mixture was stirred too aggressively before the chocolate had time to melt. Bring the cream to a gentle simmer, not a rolling boil. Let it sit with the chocolate for the full five minutes with the lid on before stirring. Then stir slowly from the center outward. If the ganache seizes, try adding a tablespoon of warm cream and stirring gently to bring it back together.
Can I use chocolate chips instead of a chocolate bar for the ganache?
Yes. About one cup of semi-sweet or dark chocolate chips substitutes well for the 6 oz of chopped bar chocolate. The ganache will still be smooth and pourable. Bar chocolate tends to melt a little more evenly and produce a silkier result, but chips work perfectly fine for an everyday bake.
How do I know when the mini bundt cakes are done?
Insert a toothpick into the thickest part of a cake — it should come out clean or with just a few moist crumbs, not wet batter. The tops will spring back lightly when pressed and the edges will begin to pull slightly away from the sides of the mold. Start checking at 20 minutes and add time in 2-minute increments from there. Every oven is a little different.
Love this recipe? Please leave a 5-star 🌟 rating in the recipe card below and/or a review in the comments section further down the page.
Be sure to check out my FREE Meal Planner and Kitchen Organizer!