Instant Pot Chicken and Rice

This Instant Pot Chicken and Rice is the kind of simple dinner everyone needs when the day gets busy. Tender chicken thighs, fluffy seasoned rice, and vegetables all cook together in one pot for a comforting meal without a sink full of dishes afterward.
The best part about this recipe is how the Instant Pot does the work while still giving you that cozy homemade chicken dinner feeling. By layering the ingredients correctly, the chicken stays juicy, the rice cooks evenly, and everything comes together into an easy meal the whole family can enjoy. One pot. Minimal cleanup. On the table in 35 minutes. That's it.
If you love simple pressure cooker dinners, my Instant Pot Chicken and Rice with Vegetables is another easy recipe that turns everyday ingredients into a comforting meal.
New to Pressure Cooking?
Start with the Instant Pot Playbook—basics, FAQs, and 40+ Recipes to get you started
About This Recipe
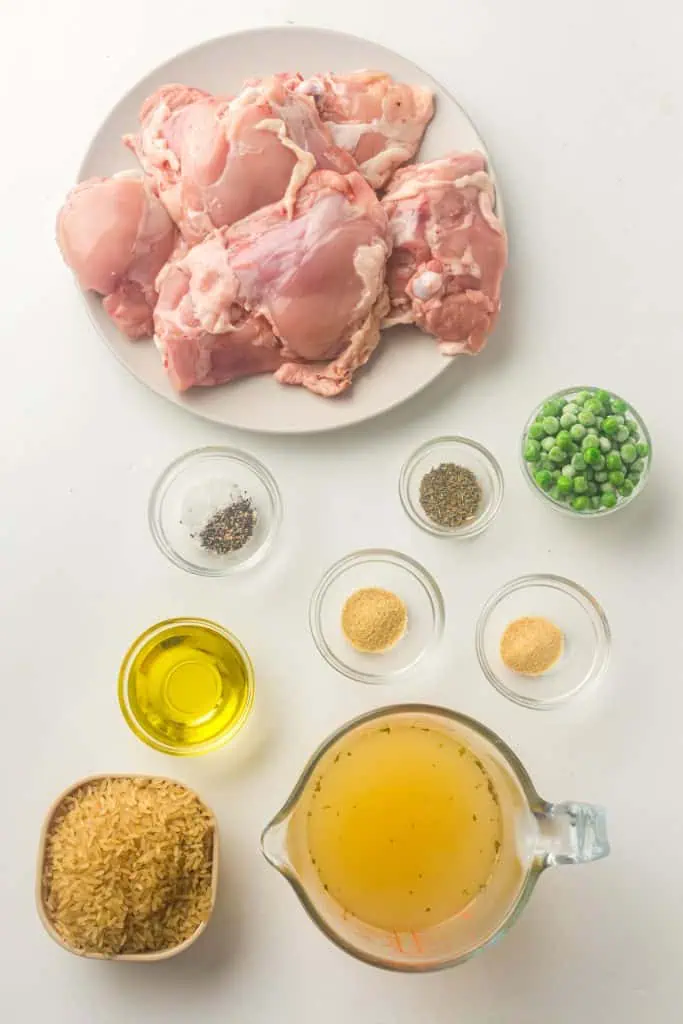
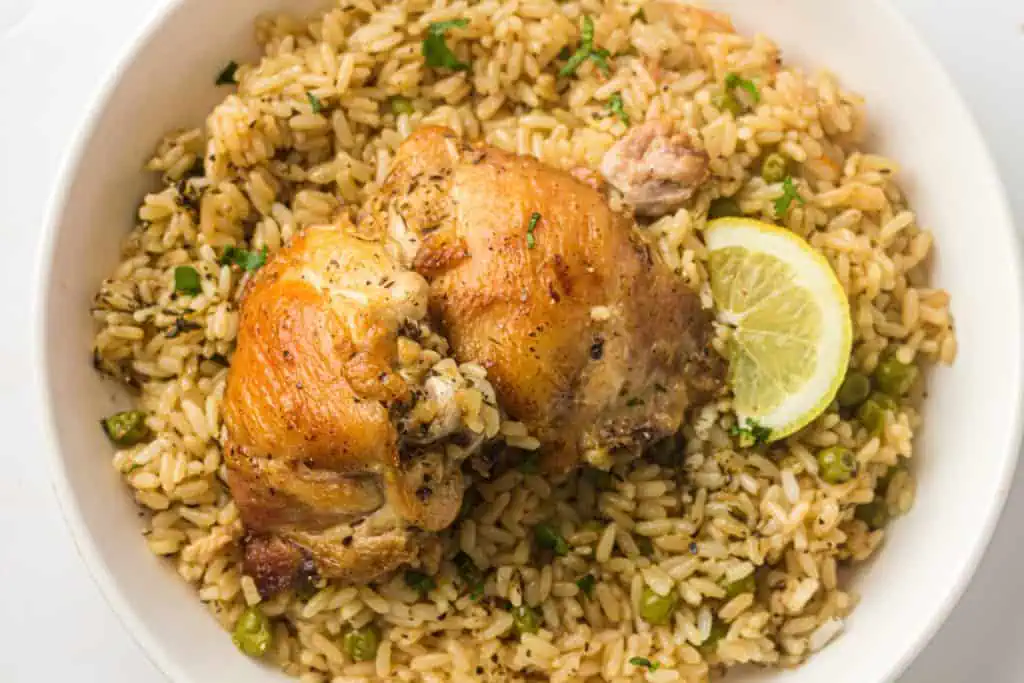
Instant Pot Chicken and Rice is a one-pot pressure cooker dinner made with 6 bone-in skinless chicken thighs, long grain white rice, chicken broth, frozen vegetables, and pantry spices. It serves 4 to 6, takes about 5 minutes of active prep plus 3 to 4 minutes of searing, and cooks on High Pressure for 12 minutes followed by a 10-minute natural release. The rice and chicken cook together in the same pot at the same time. Rinse the rice thoroughly before cooking and use exactly 1¾ cups of broth, and not more, even with the frozen vegetables added.
Recipe Snapshot
- Sear first, always: The 3 to 4 minutes of searing per side isn't optional. It builds the flavor that carries through the entire dish and gives the thighs that gorgeous golden color you see on the plate.
- Bone-in thighs are the right call: They're more flavorful, more forgiving, and produce a richer-tasting rice than boneless breast. The bone conducts heat evenly and keeps everything moist even if you run a minute or two long.
- Don't stir the frozen veg in: Add the frozen vegetables on top of the rice layer without stirring. Stirring them in before pressure cooking can cause the Burn warning.
- 1¾ cups liquid, exactly: The frozen vegetables release a small amount of moisture as they cook. The 1¾ cup measurement accounts for this. If you add more liquid than that, you'll end up with wet, gummy rice.
- 10 minute natural release matters: Cutting the natural release short can result in slightly undercooked rice. Let the pot do its thing for the full 10 minutes before quick-releasing the pressure.
- Best For: Weeknight family dinners, meal prep, Sunday batch cooking, and anyone who wants a complete one-pot meal with minimal cleanup.
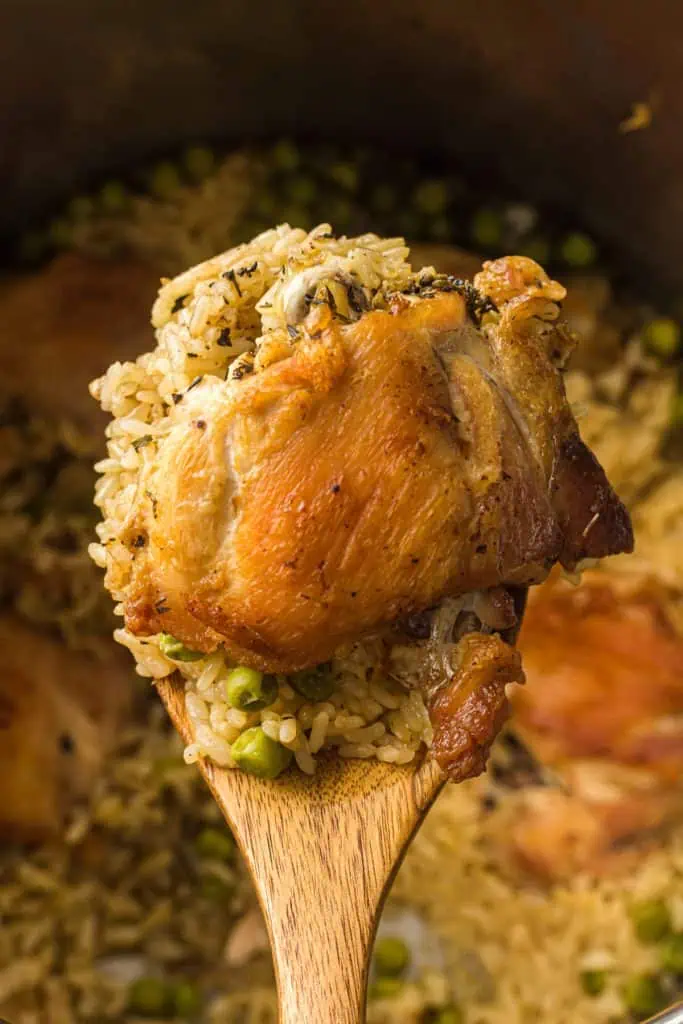
💡 David's Tip: Place the chicken thighs bone-side down on top of the rice, and not skin-side down, and not buried in the rice. Bone-side down lets the bone sit closer to the heat source and helps the thighs cook more evenly through the pressure cycle. It also means the seared skin-side faces up when you serve them, which looks a lot better on the plate.
SUMMARIZE AND SAVE THIS RECIPE CONTENT ON:
Why You'll Love This Instant Pot Chicken and Rice
Why Using Bone-In Thighs Beat Boneless Breast Here
This is worth a proper explanation because I know a lot of people default to chicken breast out of habit. In a slow-braise or pressure cooker environment, bone-in chicken thighs have three advantages that breast meat simply doesn't.
First, the fat. Chicken thighs have significantly more intramuscular fat than breast meat, which means they stay moist and juicy even if they cook a little longer than intended. Breast meat has almost no fat margin. So, if you go two minutes over in the pressure cooker, it turns dry and slightly stringy. With bone-in thighs at 12 minutes, you'd have to push to 18 or 20 minutes before the texture starts to suffer.
Second, the bone. Bones conduct heat differently than meat. They help the thigh cook more evenly from the inside out rather than from the outside in. And as the marrow and connective tissue around the bone break down under pressure, they release gelatin into the cooking liquid, which enriches the broth and, by extension, the rice.
Third, flavor. Dark meat is simply more flavorful than white meat. That's not a preference, it's a fact of fat content and muscle fiber type. The thigh has both, and the finished dish reflects it.
You can absolutely make this with boneless skinless thighs if bone-in isn't available — reduce the cook time to 8 minutes on High Pressure with the same 10-minute natural release. Boneless breast works too at 8 minutes, but the rice won't be quite as rich and you'll need to be careful not to go over.
The Ingredient Breakdown
Top Tip for a “Fabulous” Finish
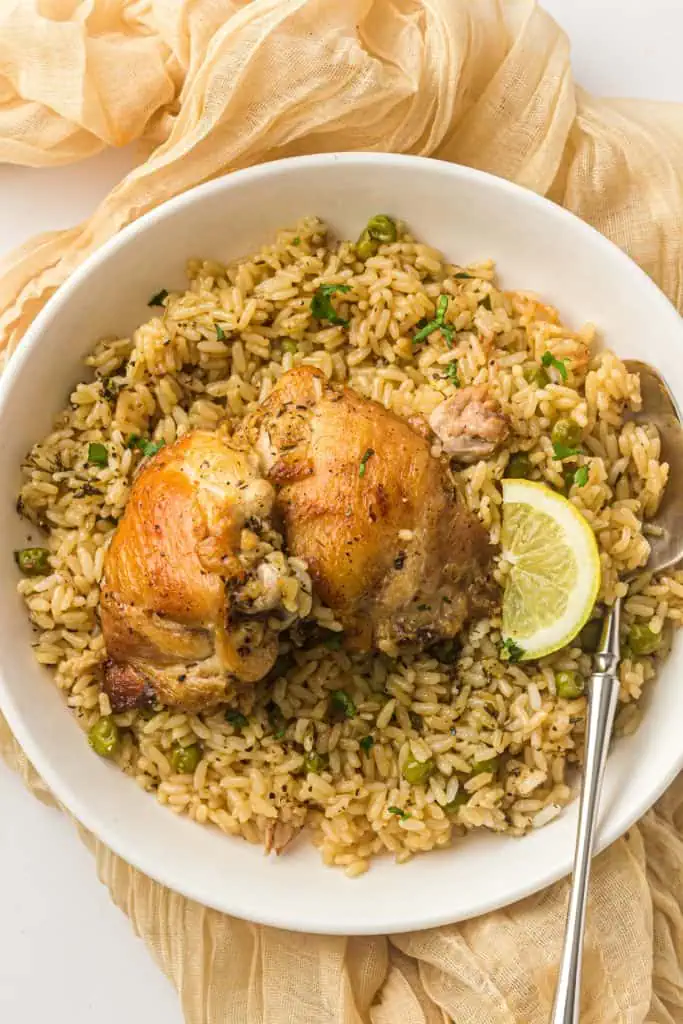
Squeeze half a lemon over the finished rice right before serving — not just as a garnish, but actually mixed into the rice. The citrus cuts through the richness of the chicken fat that has cooked into the grains and brightens the whole dish in a way that's hard to describe but immediately noticeable. It's the difference between good chicken and rice and great chicken and rice, and it takes five seconds.
How to Make Instant Pot Chicken and Rice (Step-by-Step)
Step 1: Sear the Chicken
Press the Sauté button on your Instant Pot and let it heat for a minute before adding the oil. Add the olive oil and let it shimmer — you want it hot enough that the chicken sizzles immediately on contact. Pat the chicken thighs dry with paper towels before they go in (wet chicken steams instead of browns) and place them in the pot presentation-side down. You want to hear an immediate, aggressive sizzle — if it sounds timid, the pot isn't hot enough. Sear for 3 to 4 minutes without moving them. You're looking for a deep golden-brown crust, almost mahogany at the edges. Flip and sear the other side for another 3 to 4 minutes. Remove the thighs and set aside on a plate. Press Cancel.
Step 2: Deglaze and Add the Rice
With the pot still hot from the sear, add a splash of the broth and use a wooden spoon to scrape the bottom of the liner clean — every browned bit needs to come up. This is both a flavor step and a safety step: stuck fond on the bottom triggers the Burn warning under pressure. Once the bottom is clean and the deglazing liquid has picked up all that color, add the rinsed rice and remaining broth. Add the salt, pepper, garlic powder, onion powder, and thyme (if using) and stir gently to combine everything.
Step 3: Layer, Don't Mix
Scatter the frozen vegetables evenly over the top of the rice mixture — do not stir them in. Then place the seared chicken thighs on top, bone-side down, in a single layer. Don't press them into the rice or rearrange the vegetable layer. You're building layers here: rice and broth on the bottom, frozen veg on top of that, chicken resting on top of everything. This layering keeps the rice from scorching and ensures the chicken steams properly through the pressure cycle.
Step 4: Pressure Cook
Lock the lid and set the steam release valve to Sealing. Cook on Manual High Pressure for 12 minutes. The pot will take 8 to 10 minutes to come to full pressure first — that's normal. Once it reaches pressure the timer counts down. At 12 minutes you'll hear the beeps.
Step 5: Natural Release, Then Serve
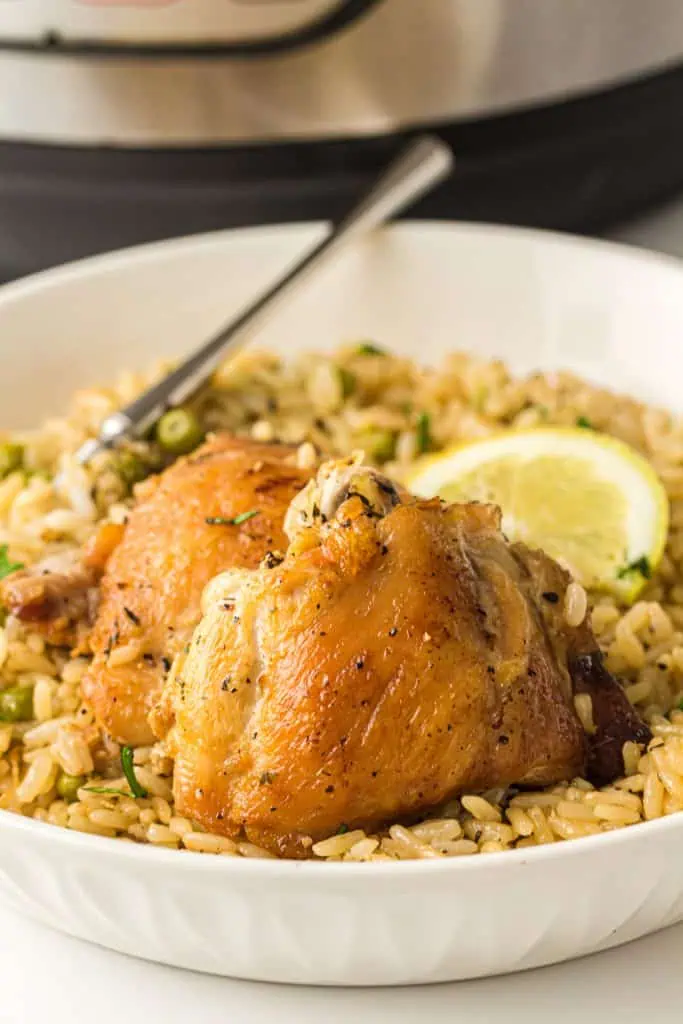
Let the pressure release naturally for a full 10 minutes — just leave it alone and don't touch the valve. The rice needs this time. After 10 minutes, carefully switch the valve to Venting to release any remaining pressure. Open the lid — the steam that escapes will smell incredible. The chicken should be deeply golden and the rice should look fluffy and fully cooked, with the peas scattered throughout. Remove the chicken thighs carefully (they may be starting to pull away from the bone, which is a good sign). Fluff the rice gently with a fork and serve with extra lemon on the side.
Fun Variations
Lemon Herb: Add the zest of one lemon to the broth before cooking and squeeze the juice over the finished rice. Stir a tablespoon of fresh chopped parsley into the rice before serving. Bright and fresh.
Cajun: Swap the thyme for a tablespoon of Cajun seasoning and add a diced green pepper to the pot with the rice. Reduce the salt to half a teaspoon since Cajun seasoning already carries significant salt.
Coconut Rice Version: Replace half the chicken broth with coconut milk. The rice will be slightly sweet and creamy, which pairs beautifully with the savory seared chicken. A sprinkle of fresh cilantro on top takes it somewhere completely different. Similar tropical vibes to my Instant Pot Pineapple Chicken.
Brown Rice Version: Use brown rice and increase the cook time to 22 minutes on High Pressure with the same 10-minute natural release. Increase the liquid to 2 cups. The texture will be chewier and the dish will be heartier — great for meal prep.
Storage and Make-Ahead Instructions
Make-Ahead Tip: This is one of the best meal prep recipes in my rotation. Make on Sunday, portion into four or five containers with rice on the bottom and a thigh on top, and weekday lunches are handled without any additional work.
Refrigerator: Cool completely and store in an airtight container for up to 4 days. Keep the chicken and rice together — the chicken stays moister stored in contact with the rice than separated from it.
Reheating: Microwave individual portions with a splash of water or broth. Cover loosely and heat in 30-second intervals, fluffing the rice between each session. The splash of liquid is what keeps the rice from drying out and turning chalky.
Freezer: Freeze in single-serve portions in freezer-safe containers for up to 2 months. Thaw overnight in the refrigerator or reheat directly from frozen with a generous splash of broth. The rice texture softens slightly after freezing but remains completely good.
Serving Suggestions
- As a bowl meal: Fluff the rice right in the pot, ladle a generous portion into a bowl, and set two thighs on top. A lemon wedge, a sprinkle of fresh parsley, and some hot sauce on the side. That's the whole presentation.
- With a crisp salad: The richness of the chicken and rice loves a bright, acidic counterpoint. A simple green salad with lemon vinaigrette is the move.
- With sliced avocado: Cold, creamy avocado against warm, savory chicken rice is a great combination — especially if you've added some heat to the rice with Cajun seasoning.
- Family style: Serve the rice in a large shallow bowl with all the thighs arranged on top. Lemon wedges around the edges, a heavy hand of fresh parsley, and it looks like a proper dinner party dish that took far more effort than it did.
More One-Pot Instant Pot Chicken Dinners
- Instant Pot Teriyaki Chicken
- Instant Pot Firecracker Chicken
- Instant Pot BBQ Chicken
- Slow Cooker Chicken and Rice Soup
- Instant Pot Chicken Broth
- Instant Pot Chicken Tikka Masala
Instant Pot Chicken and Rice is one of those recipes that's in my regular weekly rotation not because I have to make it but because I genuinely want to. It's simple, it's reliable, it tastes like real cooking, and it makes the whole kitchen smell amazing for an hour. That's my favorite kind of recipe.
Try it this week and drop a comment below — I want to hear if you did the lemon squeeze at the end, because I promise it makes a difference.

Instant Pot Chicken and Rice
Ingredients
- 6 skinless bone-in chicken thighs
- 1 tbsp olive oil
- 1 cup long grain white rice rinsed thoroughly
- 1¾ cups chicken broth or water
- 1 tsp salt
- ½ tsp black pepper
- 1 tsp garlic powder
- 1 tsp onion powder
- 1 tsp dried thyme or Italian seasoning optional
- ½ cup frozen vegetables e.g., peas or veggie mix – added frozen
Instructions
- Set the Instant Pot to Sauté. Add olive oil.Sear chicken thighs for 3–4 minutes per side until lightly browned. Remove and set aside.
- Press Cancel to turn off Sauté mode. Add rinsed rice, broth, salt, pepper, garlic powder, onion powder, and thyme (if using). Stir gently to combine.
- Sprinkle the frozen vegetables evenly on top of the rice — do not stir.Place the browned chicken thighs on top (bone side down). Do not press down or mix in.
- Secure the lid and set the valve to Sealing. Cook on High Pressure for 12 minutes
- Let the pressure release naturally for 10 minutes, then quick release any remaining pressure.
- Carefully remove the chicken. Fluff the rice with a fork and serve warm.
Nutrition
Notes
Pro Tips for Perfect Instant Pot Chicken and Rice
- Pat the chicken dry before searing: Surface moisture on the chicken prevents browning. Paper towels, all surfaces, until it's nearly dry to the touch. A dry chicken thigh in a hot pot gets golden. A wet one steams pale and grey.
- Rinse the rice until the water runs clear: Surface starch on unrinsed rice is the most common cause of gummy rice and Burn warnings in one-pot rice dishes. It takes 60 seconds and it matters.
- Deglaze before adding rice: Every stuck bit from the sear needs to come off the bottom before the lid locks. No exceptions.
- Don't add extra liquid: 1¾ cups is the number. The frozen vegetables release moisture, the chicken releases juices, and the pressure environment retains it all. More liquid means mushy rice.
- Don't skip the natural release: Quick-releasing immediately after cooking can result in slightly undercooked rice. Full 10 minutes of natural release, every time.
- Rest the chicken before serving: Two to three minutes on the cutting board before you serve lets the juices redistribute. Not critical, but worth the wait.
Tried this recipe?
Let us know how it was!FAQs: Instant Pot Chicken and Rice, Answered
Why did I get a Burn notice?
Almost always one of three things. The rice wasn't rinsed — surface starch from unrinsed rice scorches on the bottom of the liner and triggers the Burn warning. The fond from the sear wasn't fully deglazed before the lid locked. Or the liquid amount was off — too little liquid, especially with sticky unrinsed rice, creates a scorched bottom fast. Fix: rinse the rice thoroughly, deglaze the pot completely after searing, and use exactly 1¾ cups of liquid. If you get the Burn notice, open the pot, add ¼ cup more broth, scrape the bottom, and try again.
Can I use boneless skinless chicken thighs?
Yes. Reduce the cook time to 8 minutes on High Pressure with the same 10-minute natural release. Boneless thighs won't enrich the rice quite as much as bone-in, but they're still much better than breast meat for this application — juicier, more flavorful, and more forgiving if you run a minute long.
Can I use chicken breast instead?
You can. Use boneless skinless chicken breast and reduce the cook time to 8 minutes on High Pressure. The key is not to go over — breast meat dries out quickly under pressure. The finished rice won't be as rich-tasting as the thigh version, but it's still a solid weeknight dinner. Pound the breasts to an even thickness before searing so they cook evenly.
My rice came out wet or mushy. What went wrong?
Too much liquid, or the rice wasn't rinsed. Make sure you're using exactly 1¾ cups of broth — not 2 cups, not “about 1¾.” Also confirm the rice was thoroughly rinsed before cooking. If it's happening repeatedly, try letting the cooked rice sit uncovered on the Keep Warm setting for 5 minutes after opening the lid — the residual heat evaporates excess moisture and the grains firm up nicely.
Can I double the recipe?
Yes, with some adjustments. Use 2 cups of rice and 3 cups of broth (still less than a 1:2 ratio because of the retained steam). Keep the cook time the same at 12 minutes. Use a larger slow cooker insert or make sure everything fits below the max fill line. The chicken quantity can scale up as long as it fits in a single layer on top of the rice.
Do I have to sear the chicken first?
No — but you should. Skipping the sear produces a pale, less flavorful result. The golden crust is what gives the chicken its color and what builds the flavor base for the entire dish. Without it, the chicken comes out looking steamed and the rice tastes noticeably blander. The sear takes 8 minutes total. It's 8 minutes that genuinely improves the dish.
Can I use frozen chicken thighs?
You can pressure cook frozen chicken, but you can't sear it — and skipping the sear is a real compromise with this recipe. For the best result, thaw the chicken first. If you're genuinely in a pinch, add the frozen thighs directly to the pot on top of the rice layer without searing, increase the cook time to 18 minutes on High Pressure, and use the full 10-minute natural release. Season the thighs heavily before they go in since you won't have the sear to develop flavor.